
I have recently returned to model railwaying after a hiatus of over a decade. Since I last modelled, things have changed considerably, with the wide availability of modelling software which allows layouts to be carefully designed in advance — ensuring the design will fit in the space, and that the required track is available.
In terms of track, most modellers now recommend Peco Streamline track for a range of reasons including: it is believed to be better running, the point radii are more suitable for high speed running of large locos, and there is a wider range of pre-made track pieces available. With all that said, I still have a large collection of SeTrack so I decided to design my layout to work with this track to avoid the cost of replacing it with newer Streamline.
Building a basic circle with SeTrack is simple enough, but more complex layouts can become tricky, and so I decided to look on google for some standard geometry layouts to help me. Hornby provide a fairly basic layout themselves which is partially useful for curved points, but I was unable to find any other geometry sites that included a comprehensive set of correct geometries. The best I managed to find was FreeTrackPlans.com which was a very useful starting point, but sadly includes several examples which don’t actually fit very well together.
Below are a large set of track geometries I have designed in AnyRail 5. The AnyRail plan is also available. I should note that there are some examples below that technically don’t fit perfectly — however I have restricted these imperfections to instances where the problem is caused by a straight piece which is fractionally too short. I believe that in a real world model this error is so small that it wont matter, and furthermore that a modeller could easily correct them by using a longer straight piece and cutting it to length. Such very minor mismatches are highlighted in pink at the joint in question. All such imperfections are within the AnyRail tolerances — as their manual says: “Sometimes you can make the track fit by using the play (wiggle room) in the track. While this can be considered cheating, sometimes you don’t even notice that you’re doing just that when laying real track”.
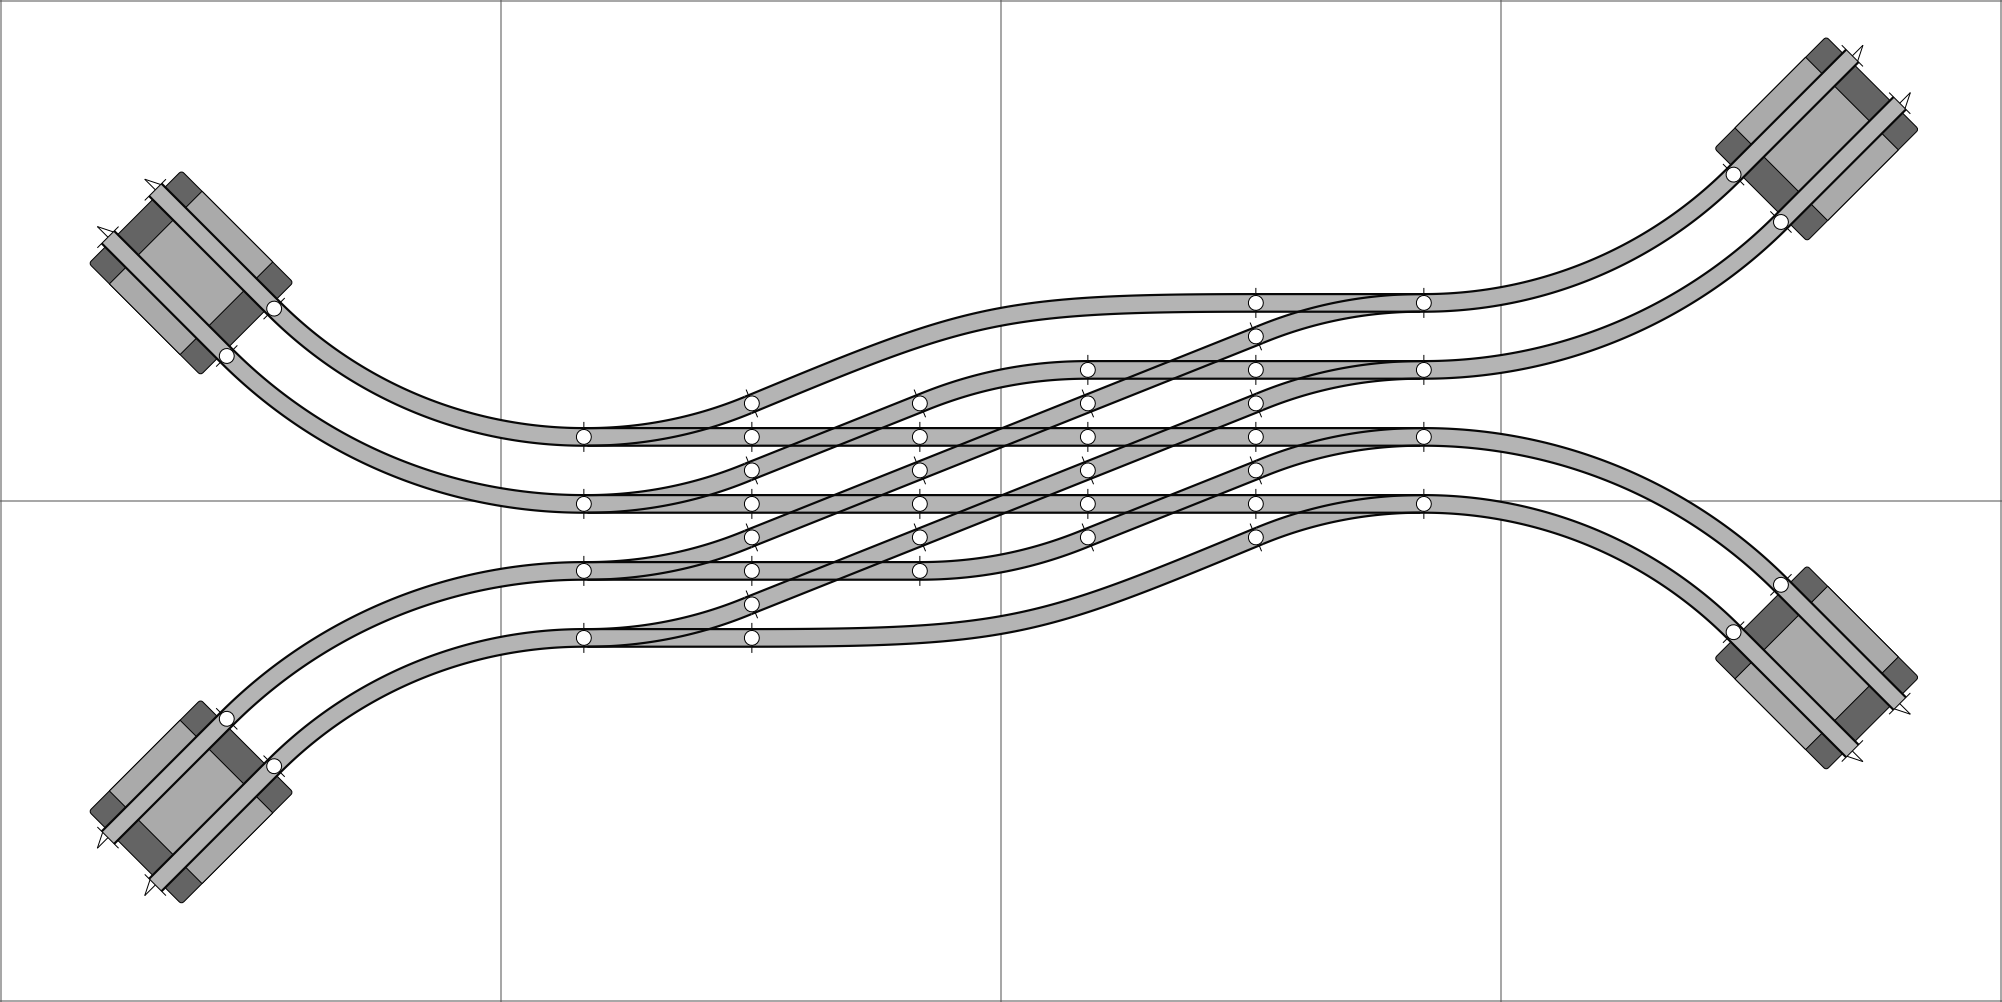
You may notice a lot of level-crossings at the ends of each geometry — these are present to demonstrate that the track at the ends is equal in length and the correct 67mm parallel separation for SeTrack.
Where shown the grid lines illustrate 50cm squares for scale purposes
One last thing to note are the following specifications for HO and OO gauge track standards. The geometries below are for 67mm Hornby/SeTrack, not for 50mm Peco/Streamline
4mm OO Gauge track geometry — Hornby Standard, Peco Setrack, & Bachmann Branchline
- Track gauge: 16.5mm
- Track spacing: 67mm (centre-to-centre)
- Track spacing: 37.5mm (sleeper edge-to-edge)
- Track width: 16.5mm (rail-to-rail)
- Rail heights: code 100
- Turnout angle: 22.5°
- 1st curve radius: 371mm
- 2nd curve radius: 438mm
- 3rd curve radius: 505mm
- 4th curve radius: 571.5mm
4mm HO Gauge track geometry — Peco Streamline
- Track gauge: 16.5mm
- Track spacing: 50mm (centre-to-centre)
- Track spacing: 20.5mm (sleeper edge-to-edge)
- Track width: 16.5mm (rail-to-rail)
- Rail heights: code 100, 83 or 75
- Turnout angle: 12°
- 1st curve radius: 371mm*
*Streamline track doesn’t come with fixed curve pieces, however, Peco advertise their Setrack as 100% compatible with Streamline code 100. Any curve with a radius less than 371mm is likely to cause derailments for many RTR models.
Updates
- 24-Sept-2015: Added 15 new geometries, mostly of stations
- 9‑Mar-2017: Added 8 new geometries
- 19-June-2020: Clarified streamline track curves
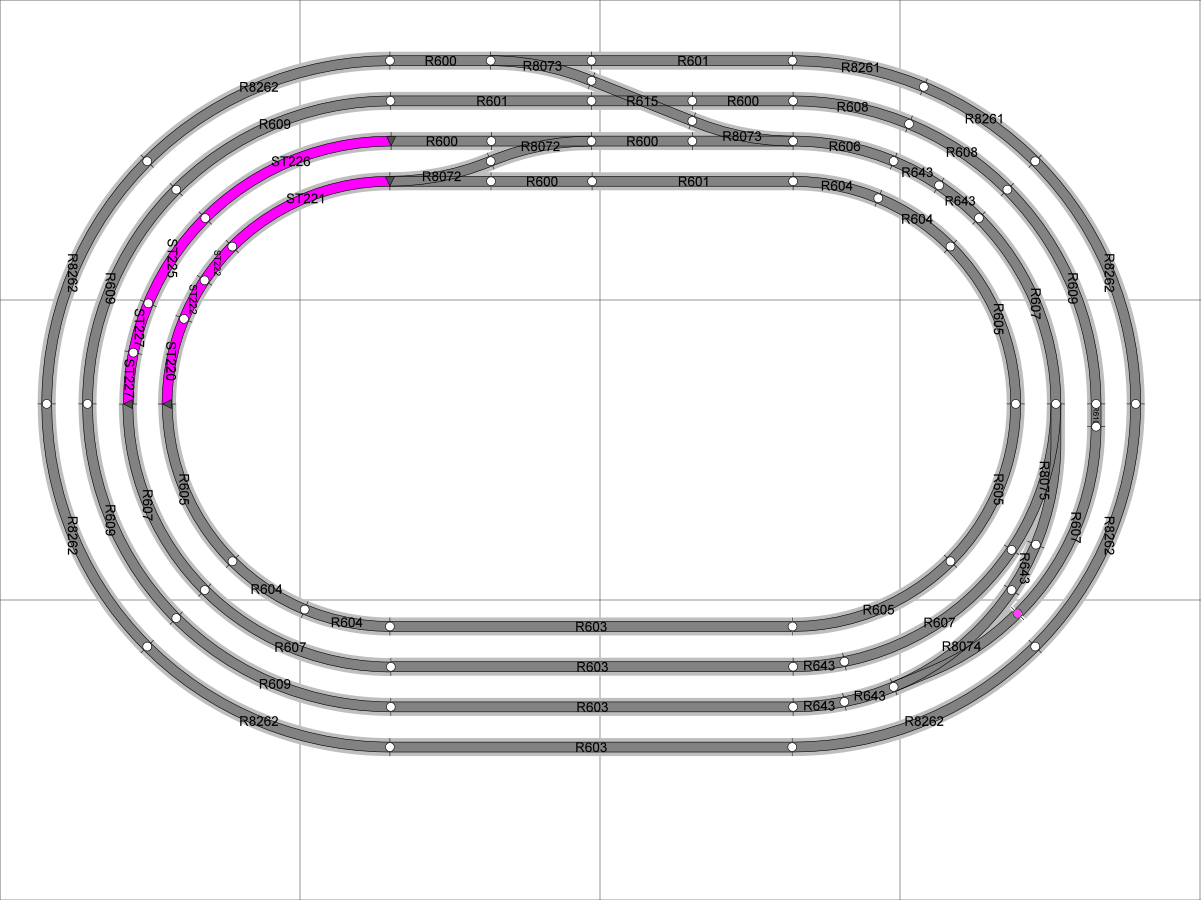
Hornby 4 track loop standard dimensions
Standard parallel turnout geometries
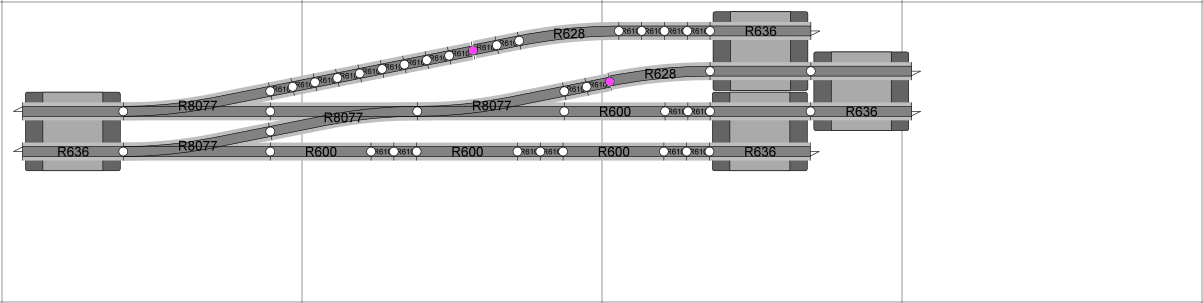
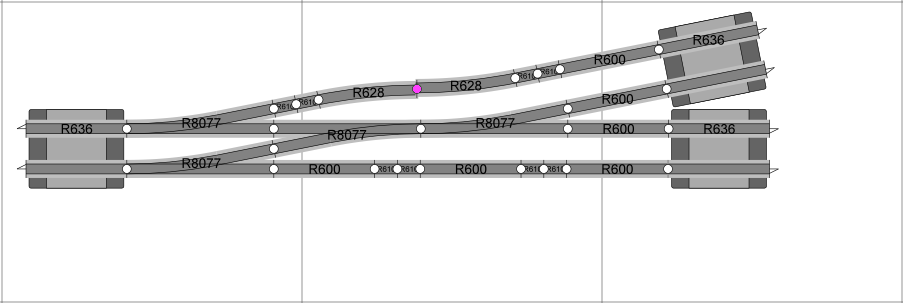
Express parallel turnout geometries
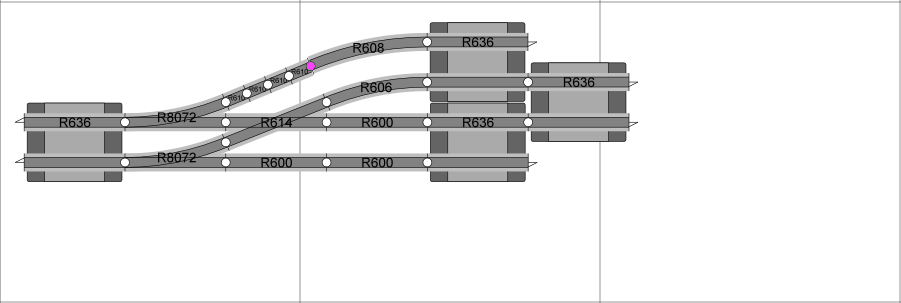
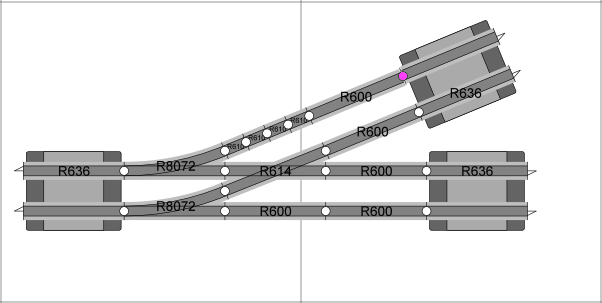
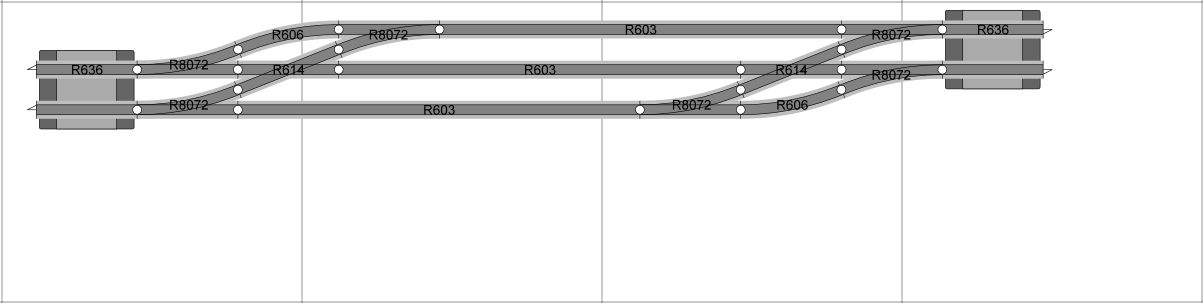
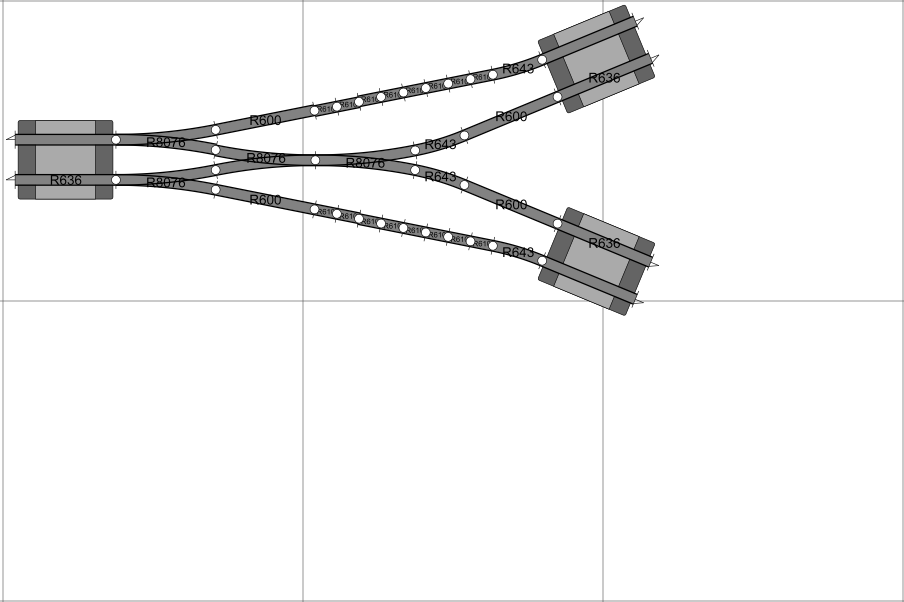
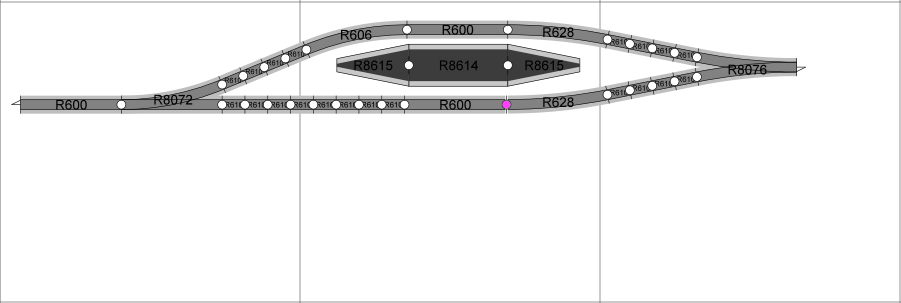
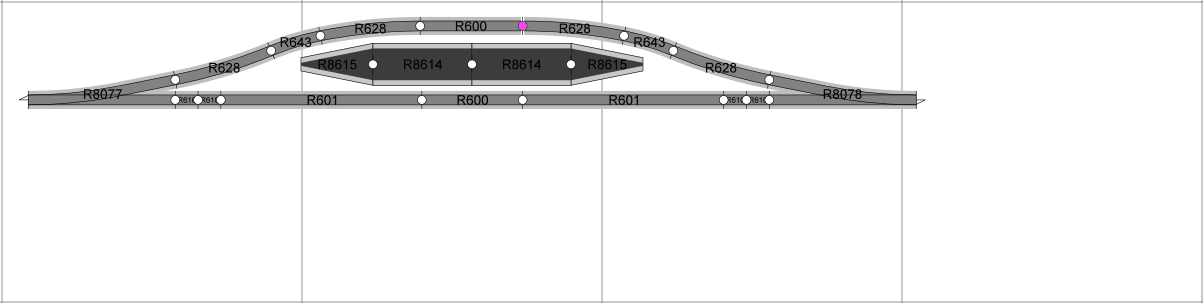
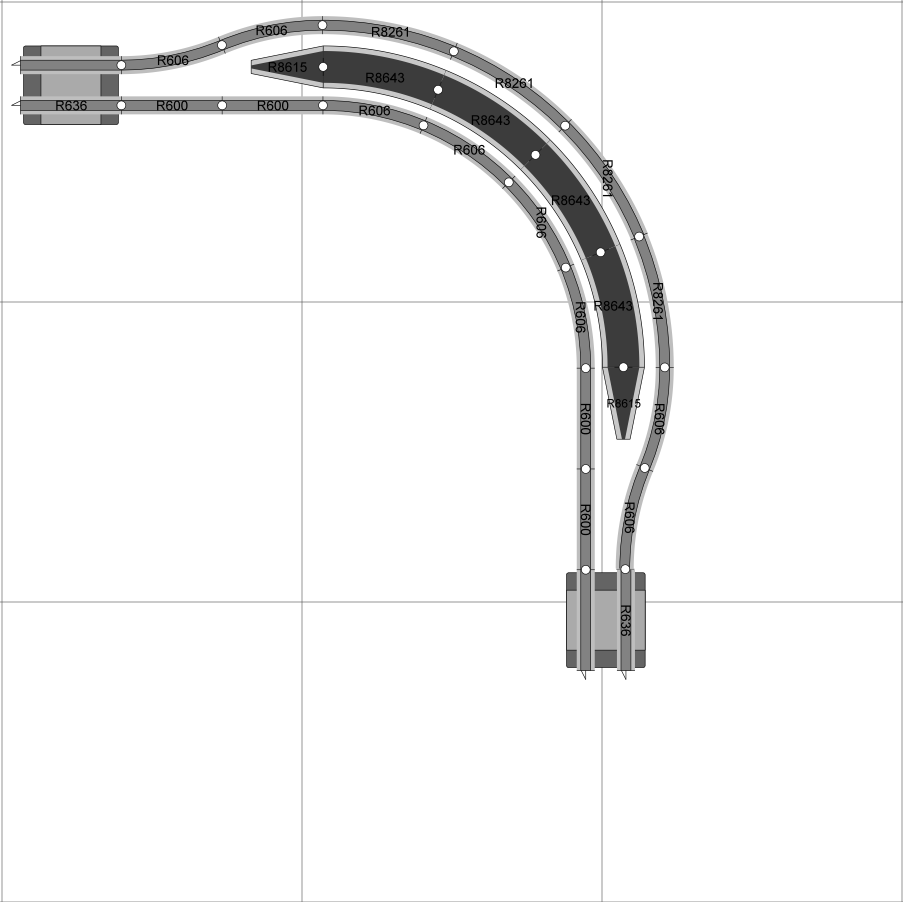
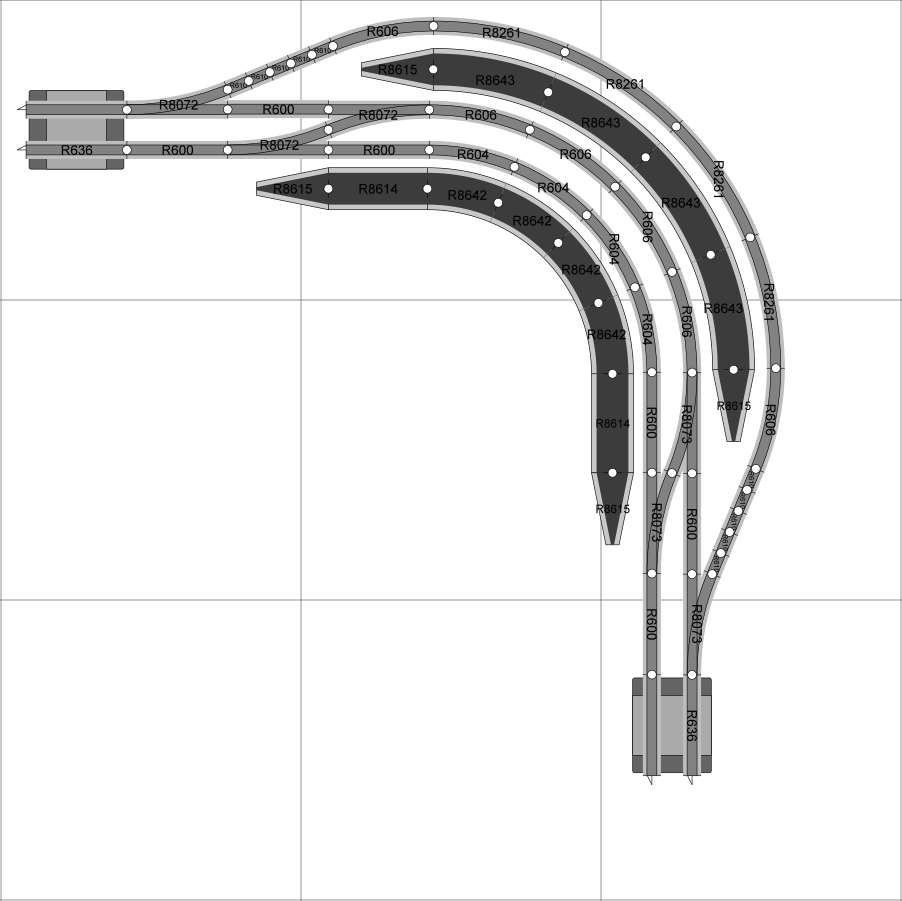
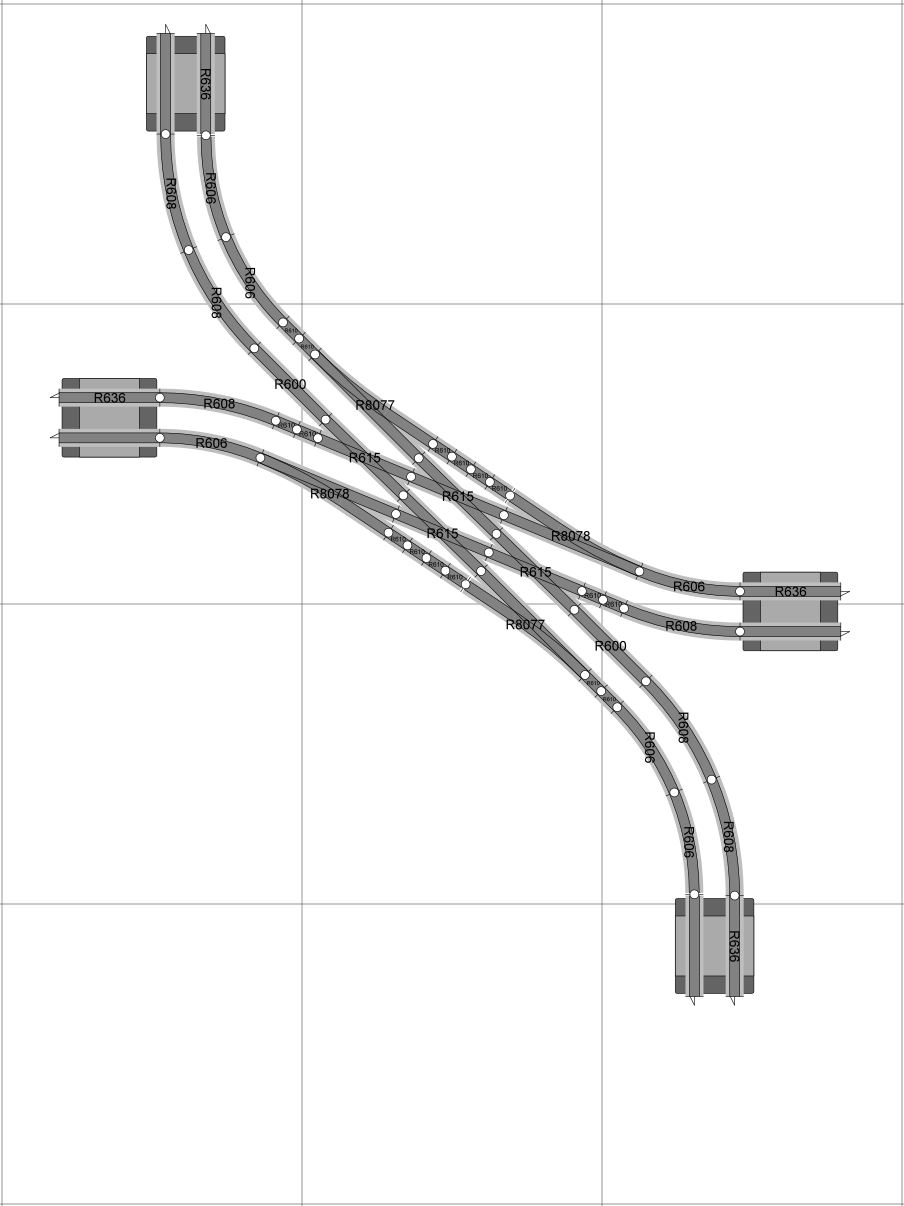
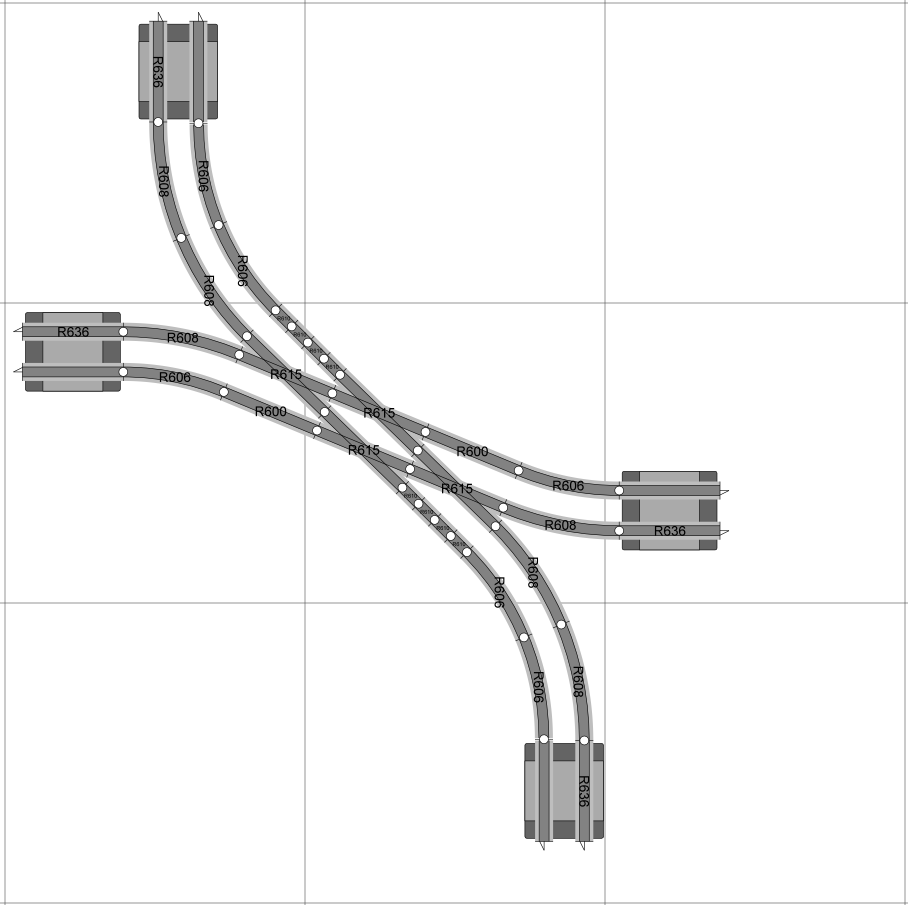
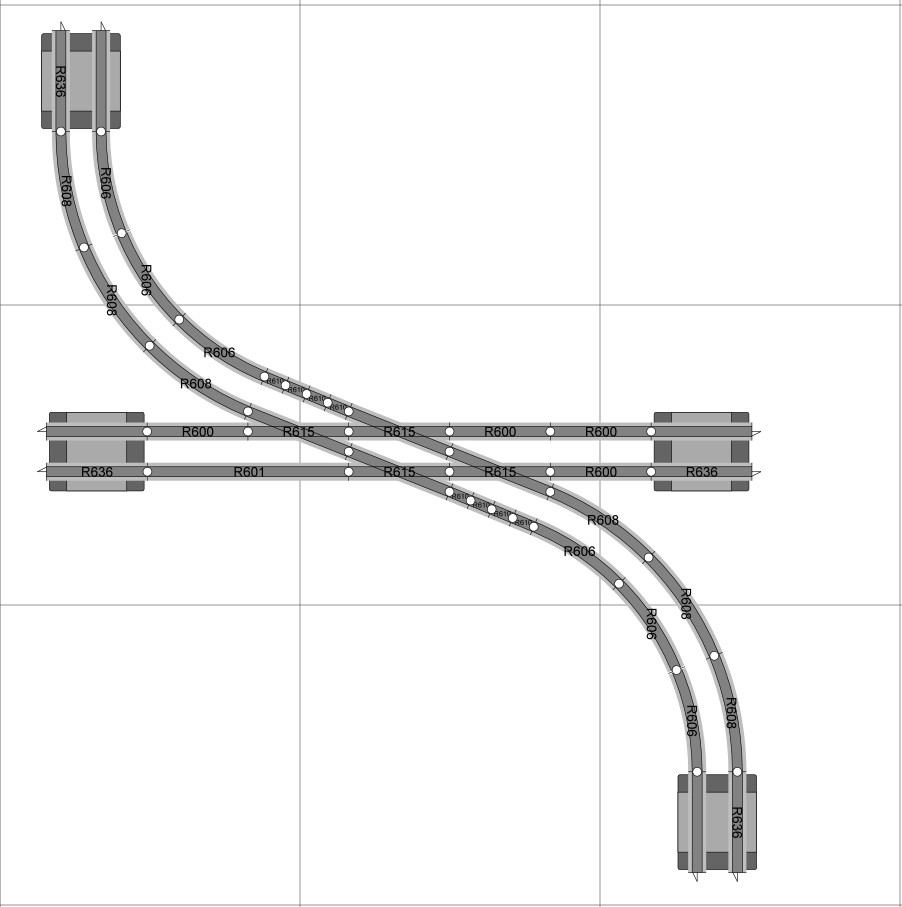
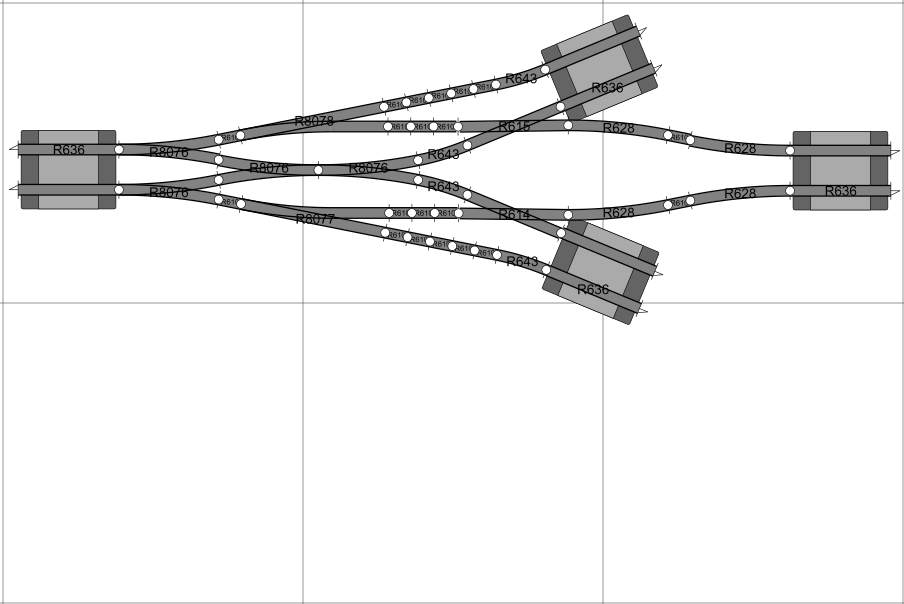
Angled turnout geometries
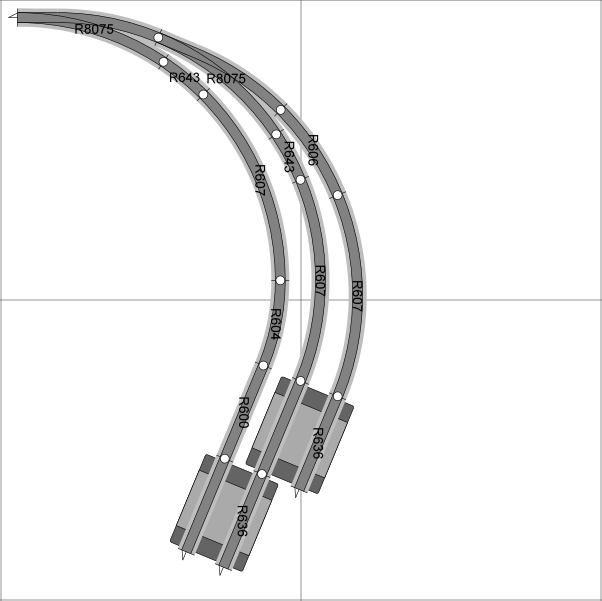
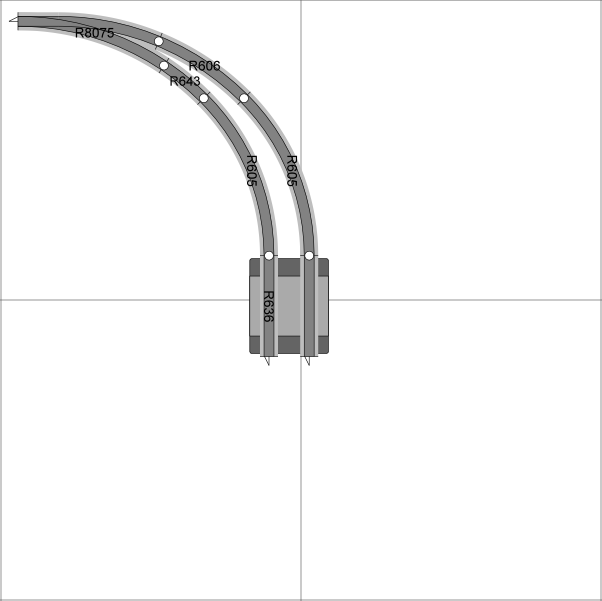
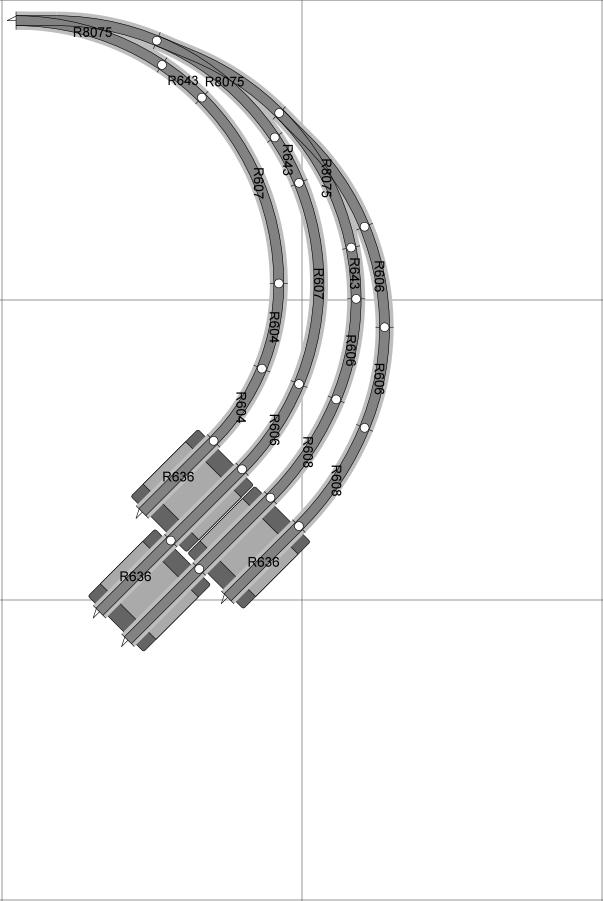
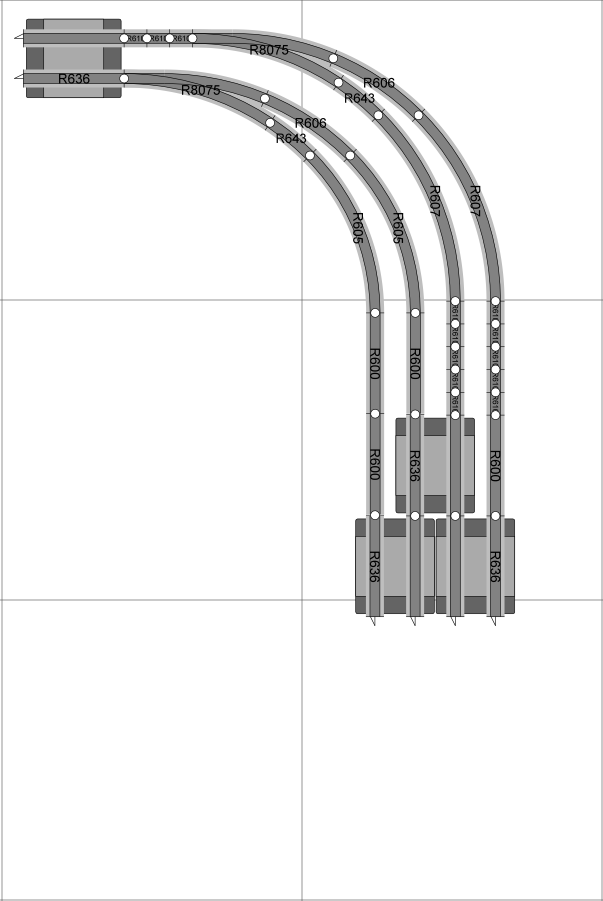
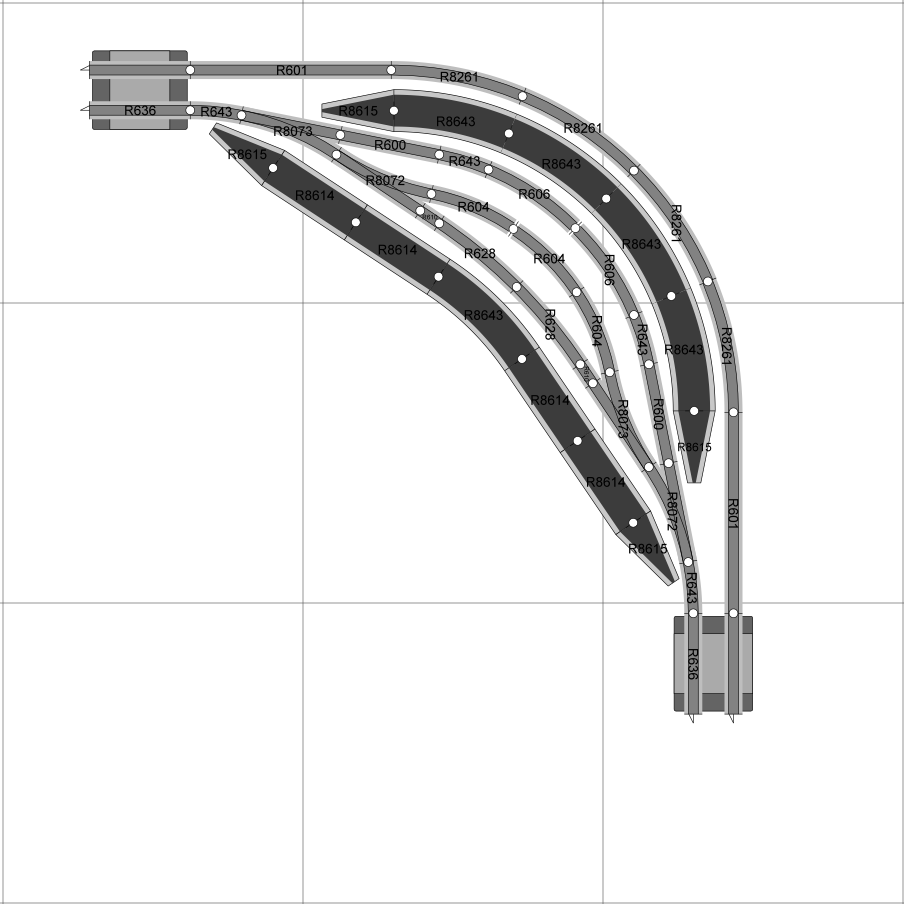
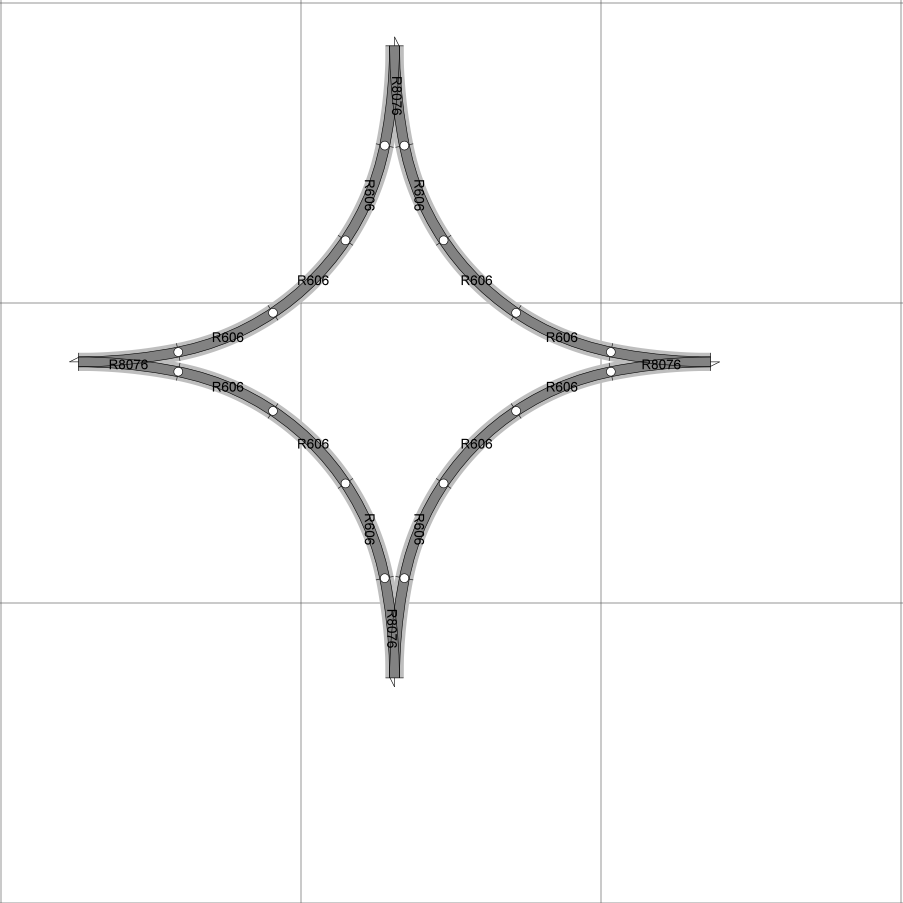
Curved turnout geometries


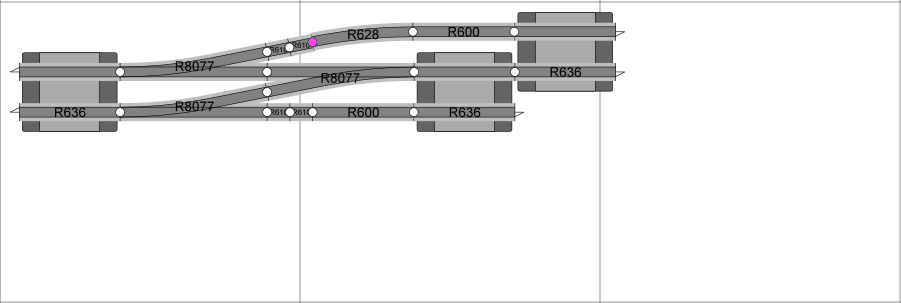
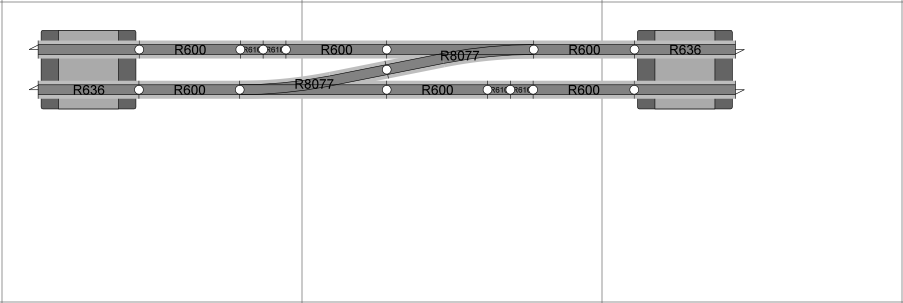
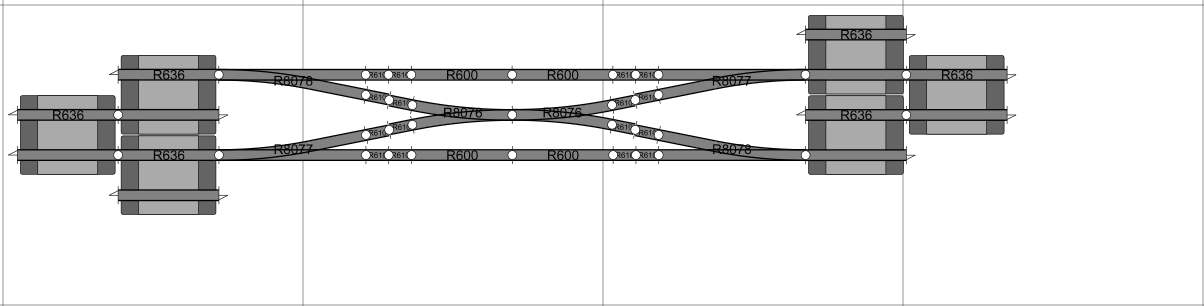
X‑crossing and Scissor-crossing geometries


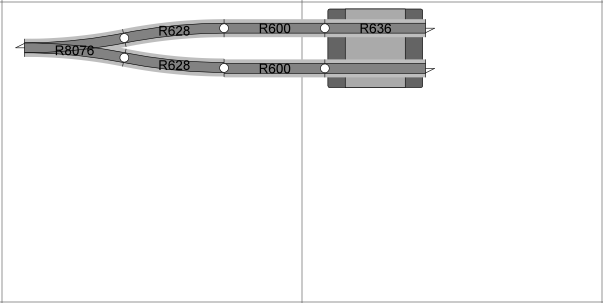
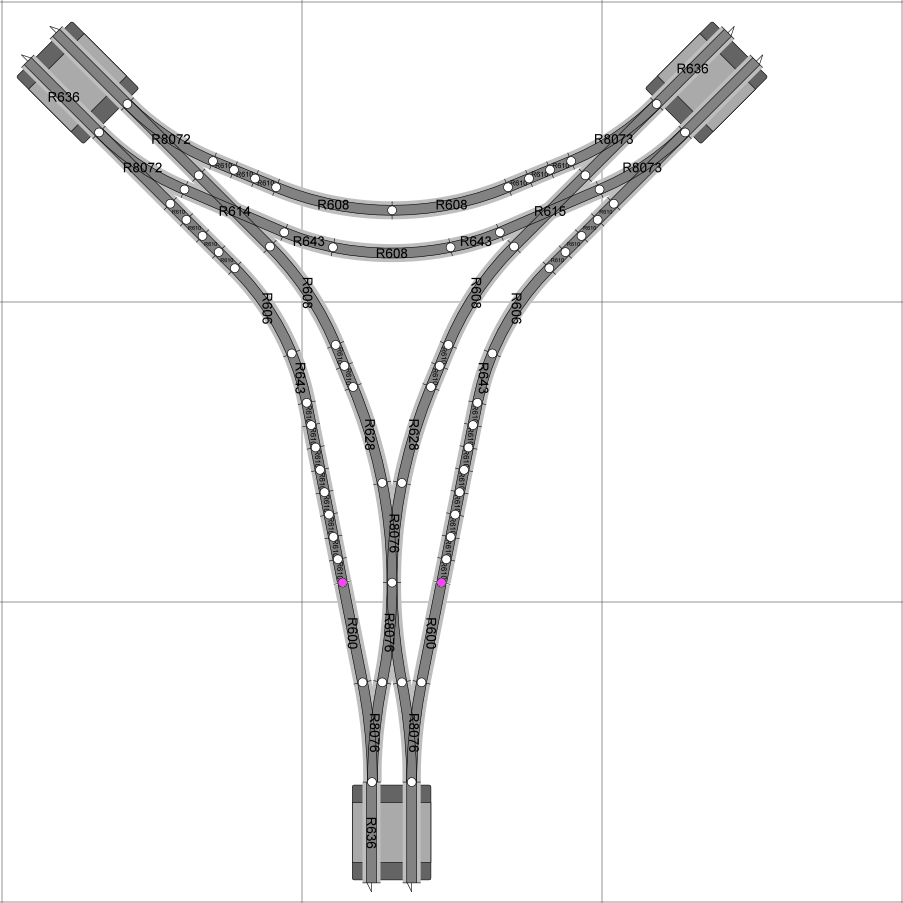
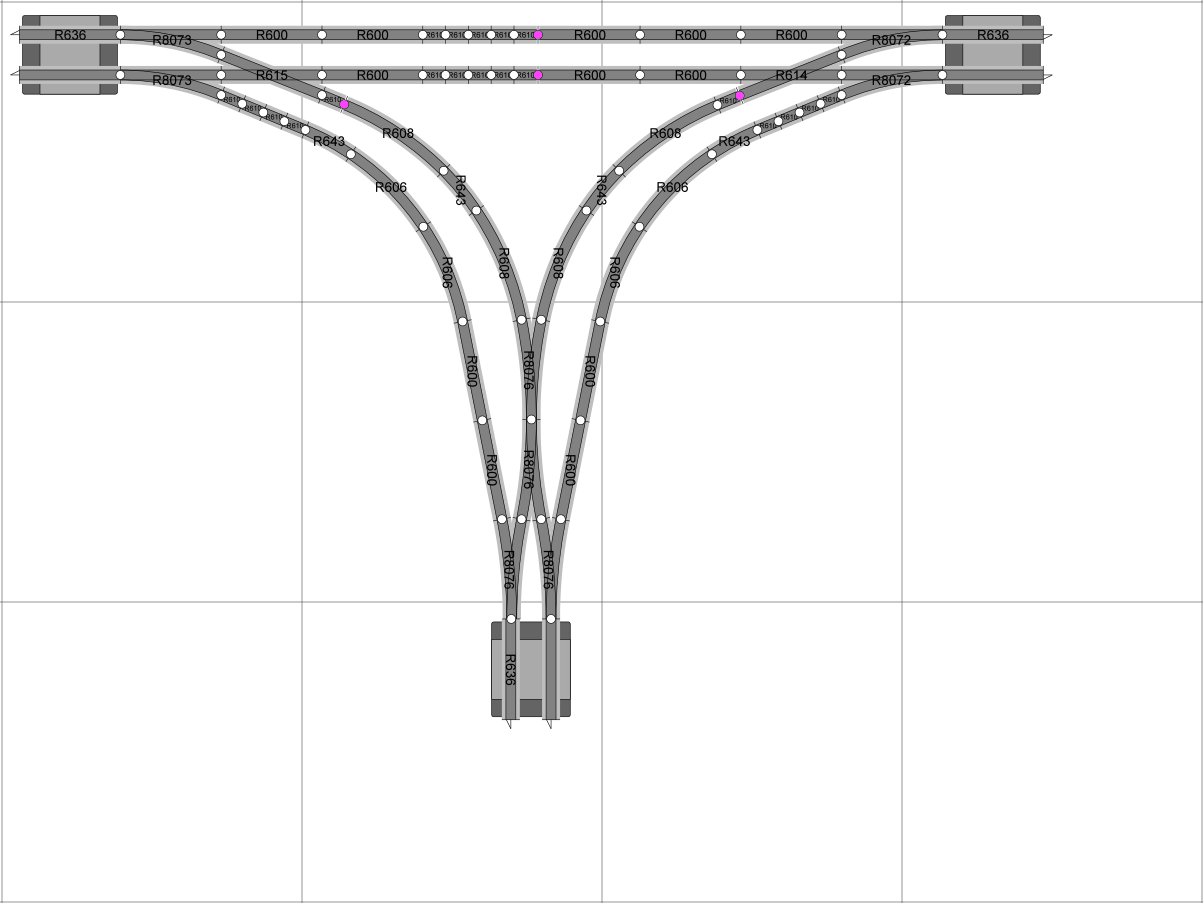
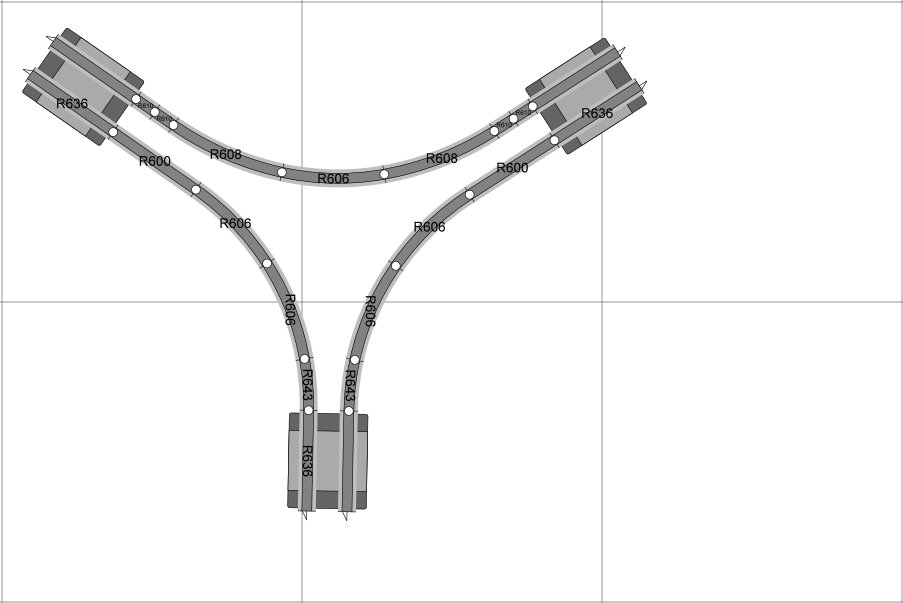
Y‑junction and T‑junction geometries

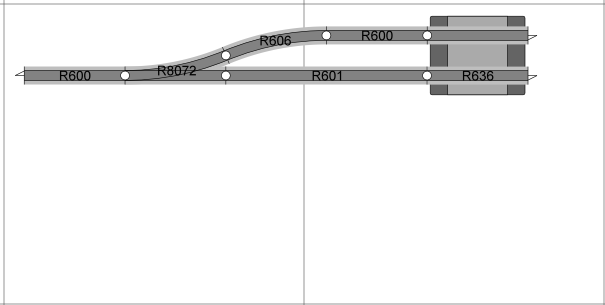
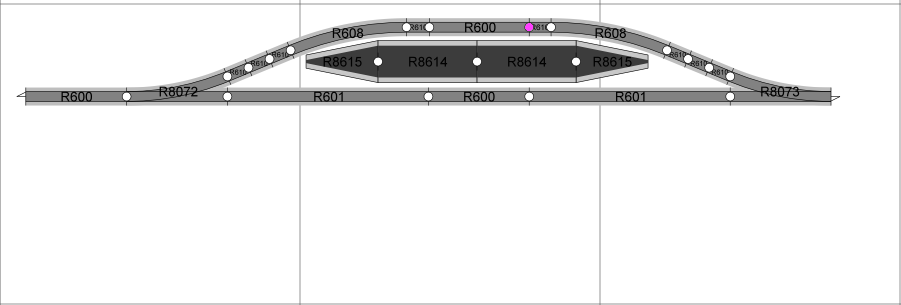
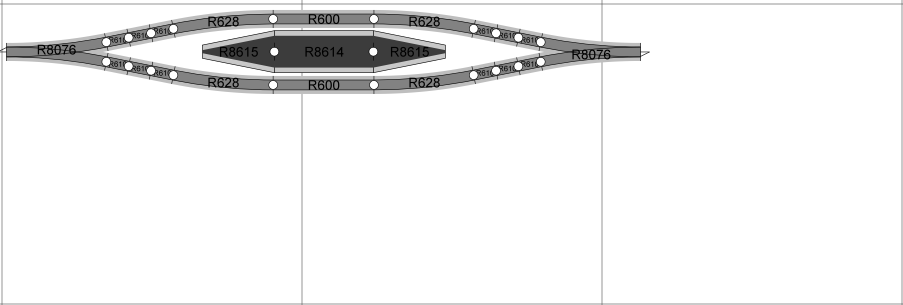
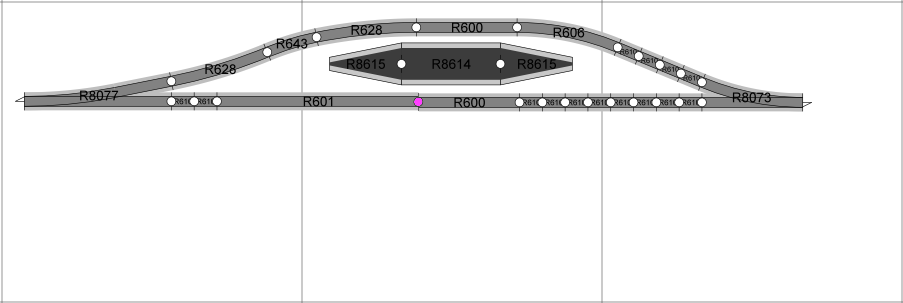
Basic Station geometries

Major station geometries

Curved station geometries
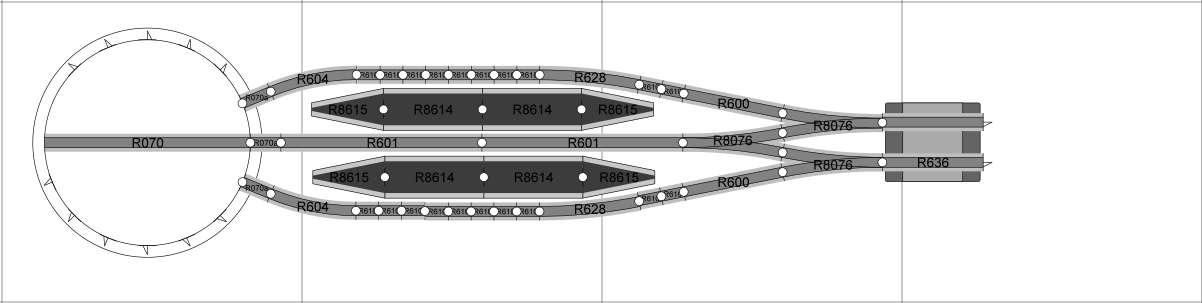
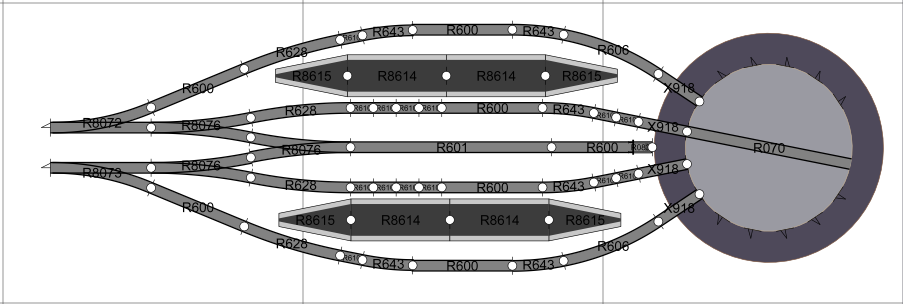
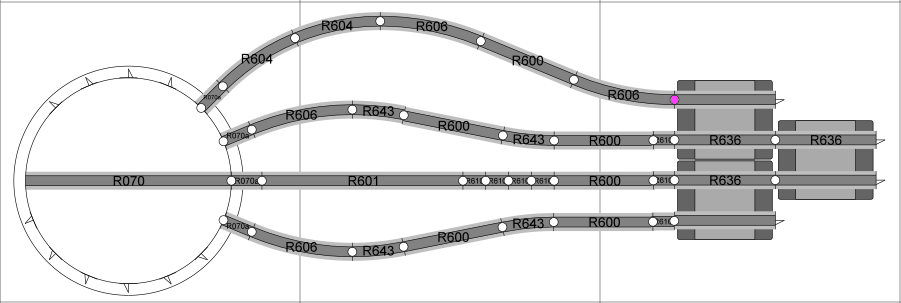
Terminus station with turntable geometries
Turntable geometries
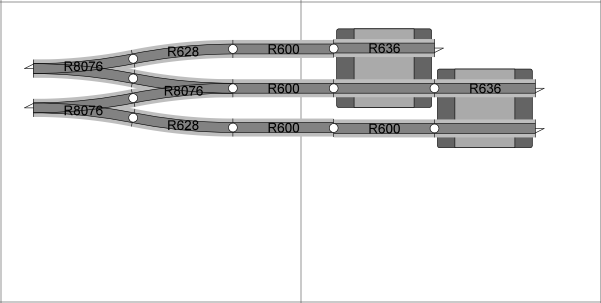
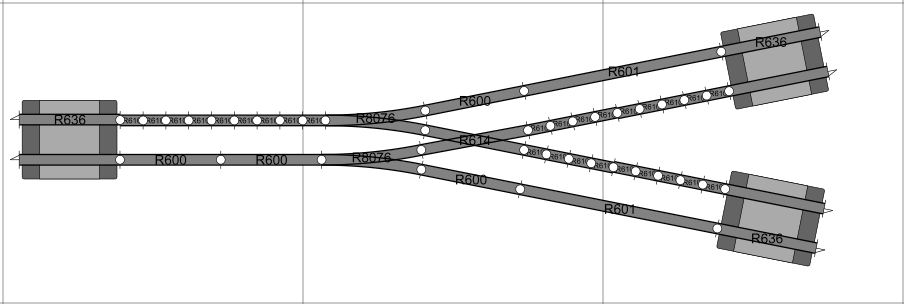
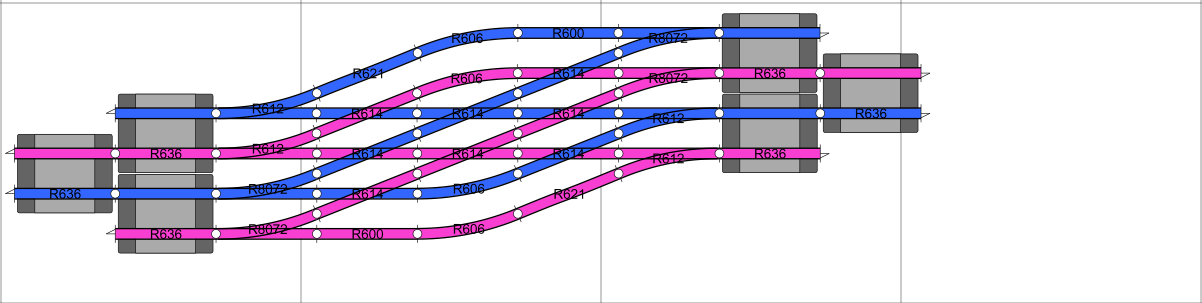
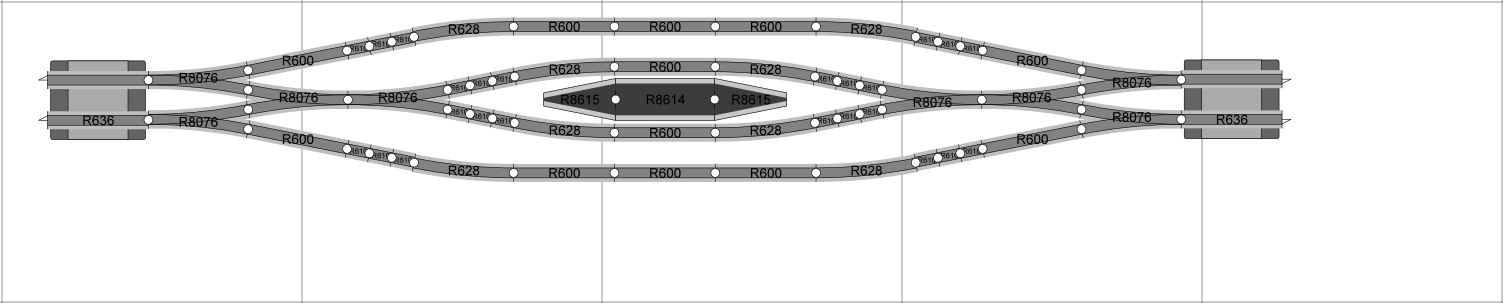
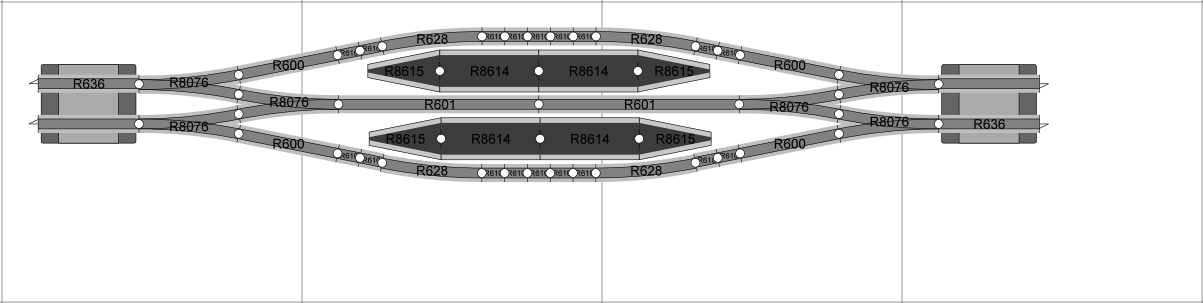
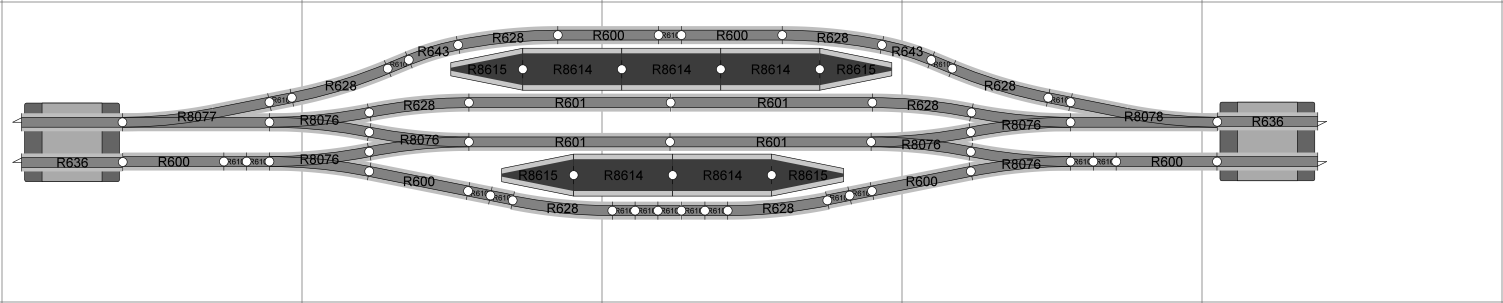
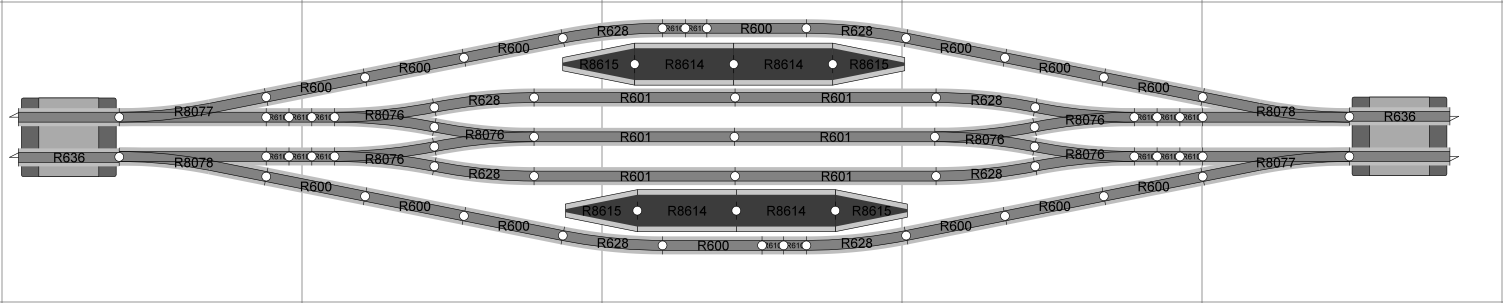
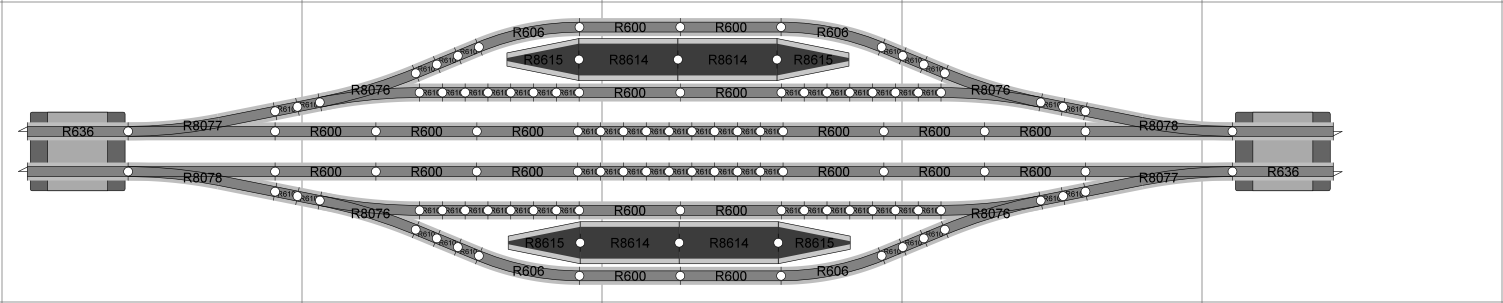
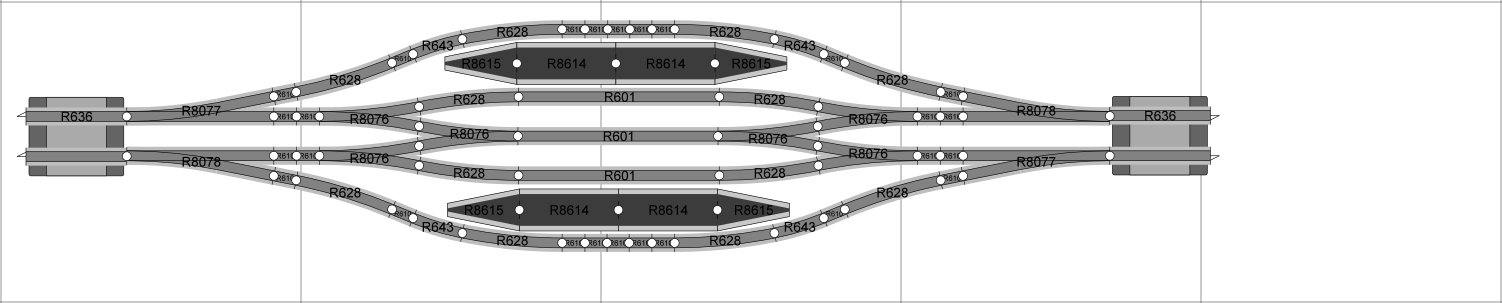
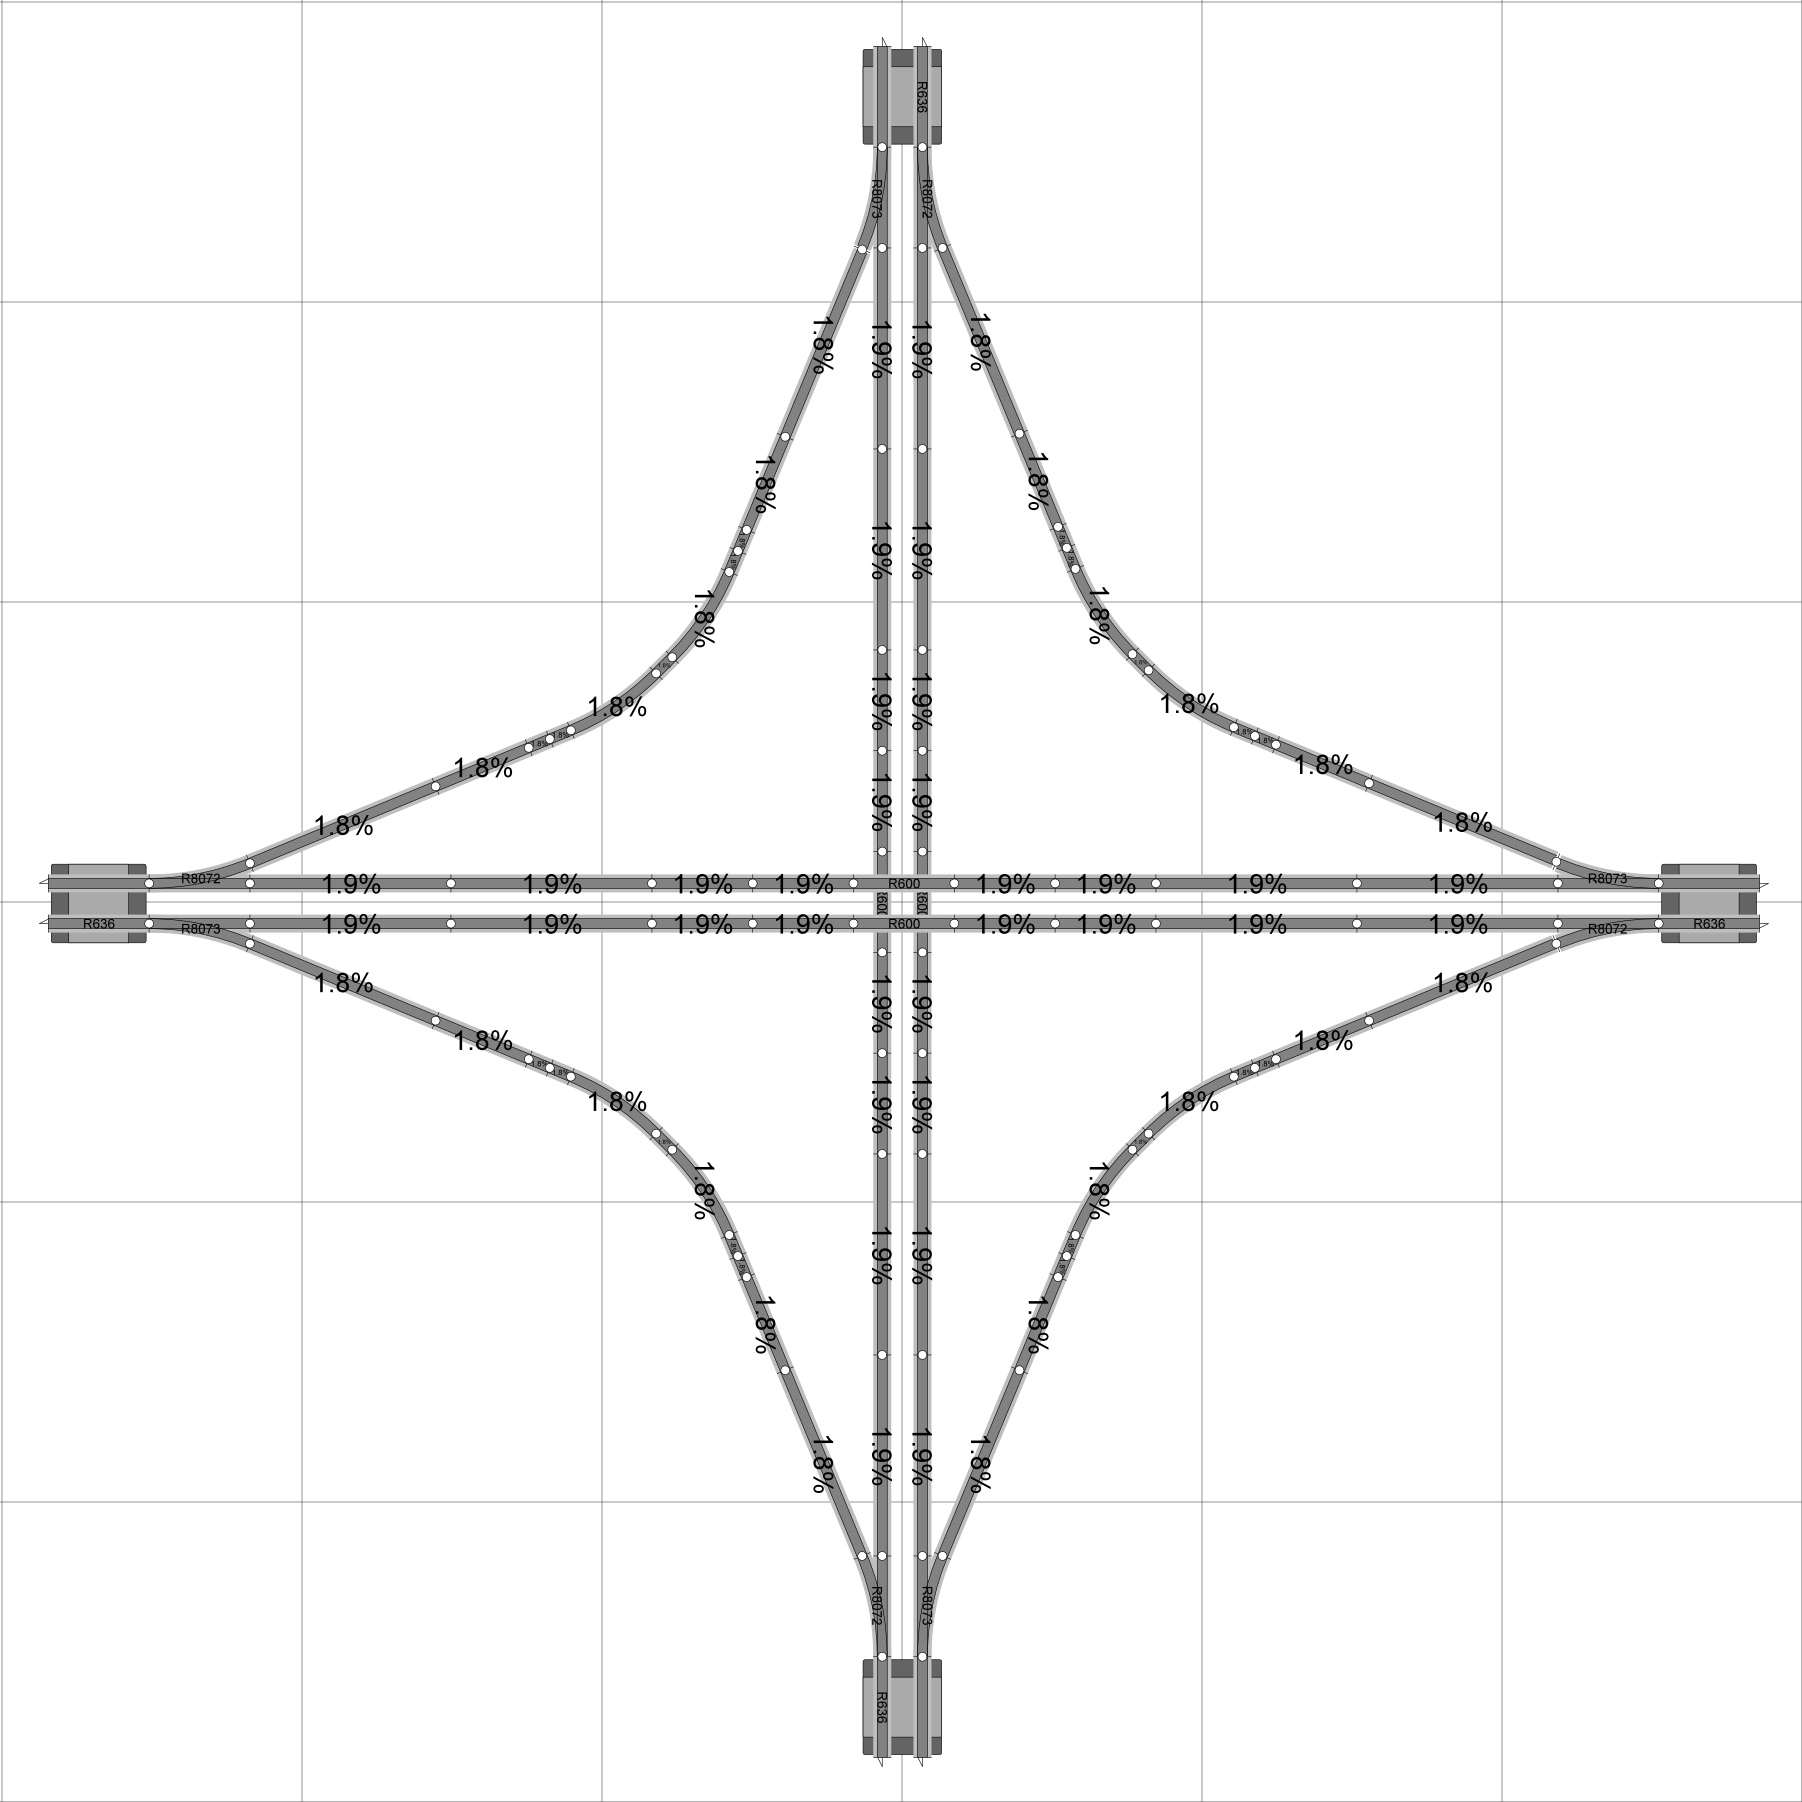
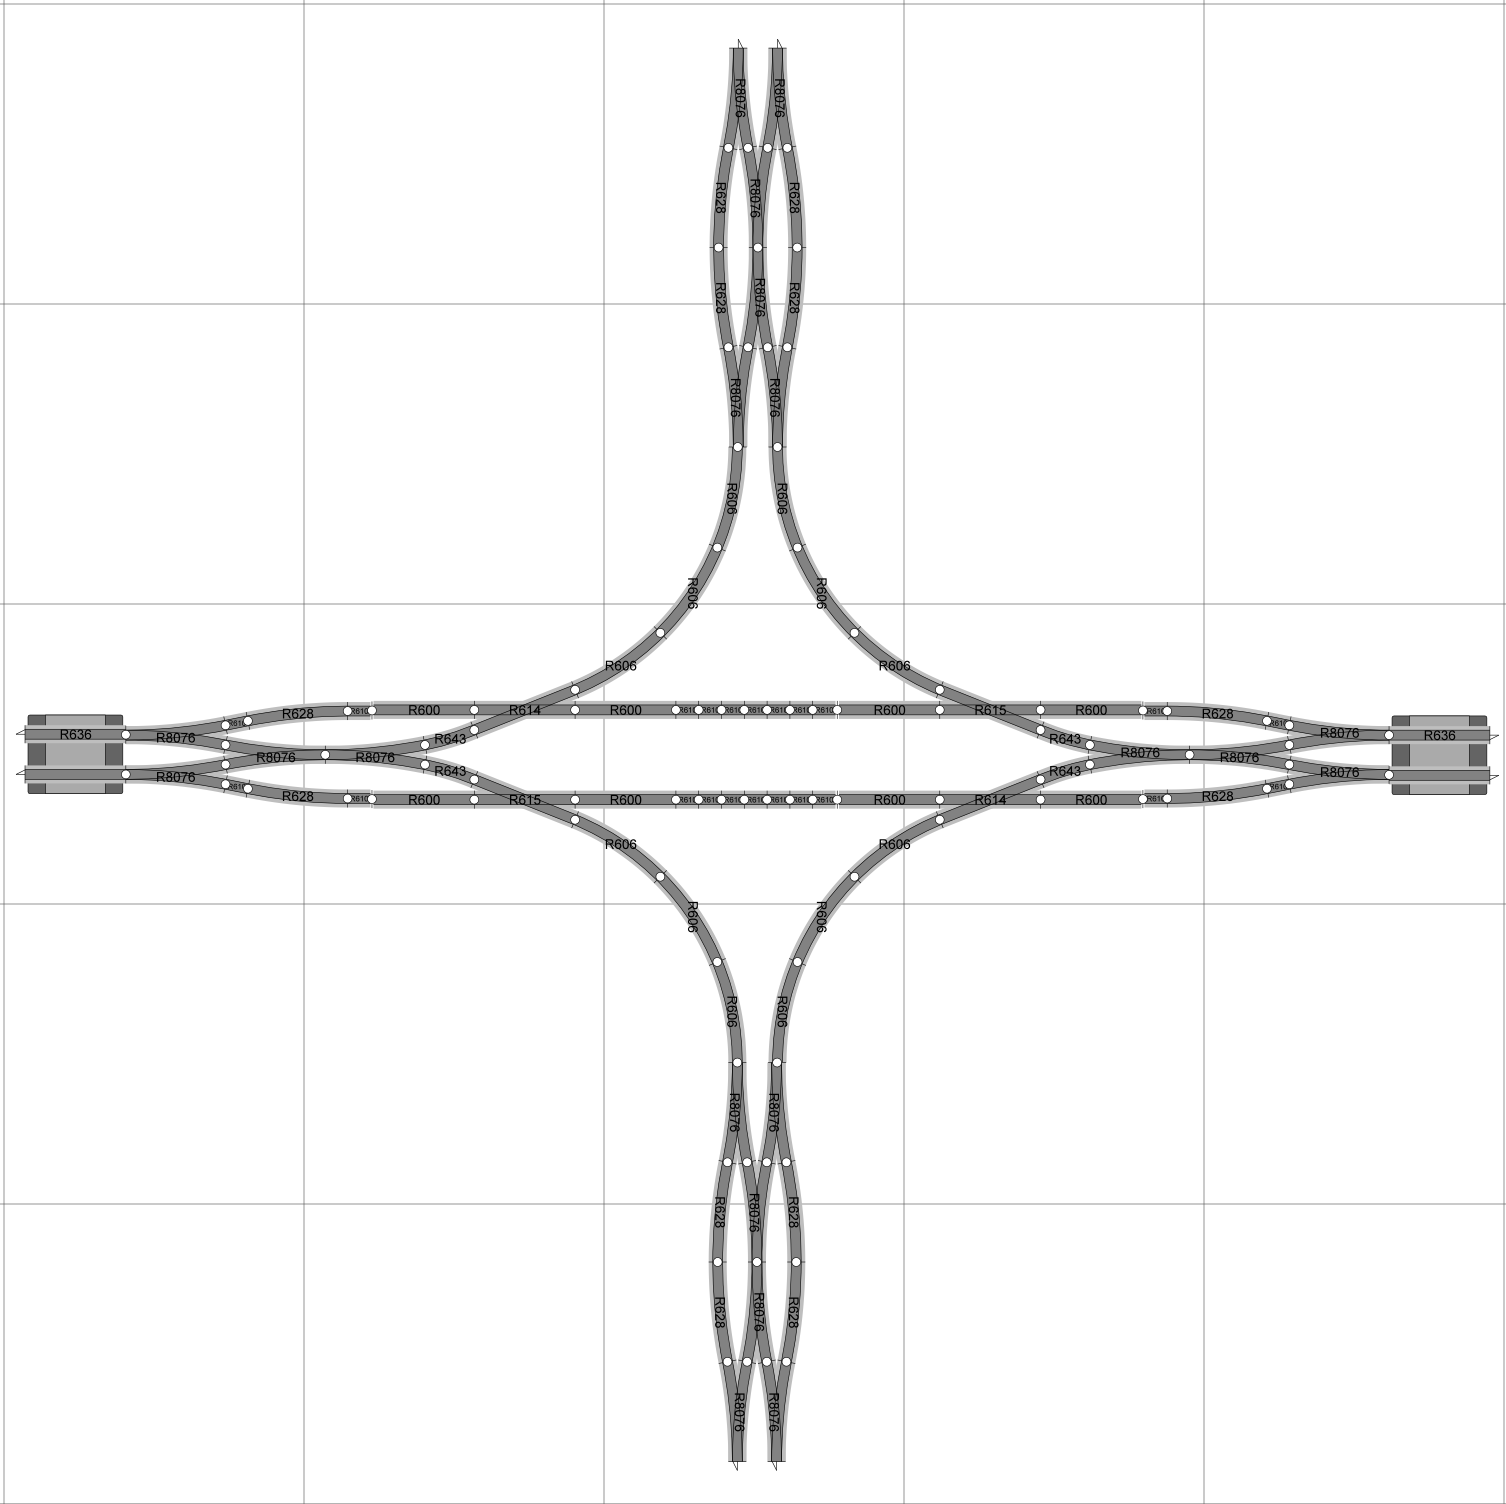
4‑way junction geometries


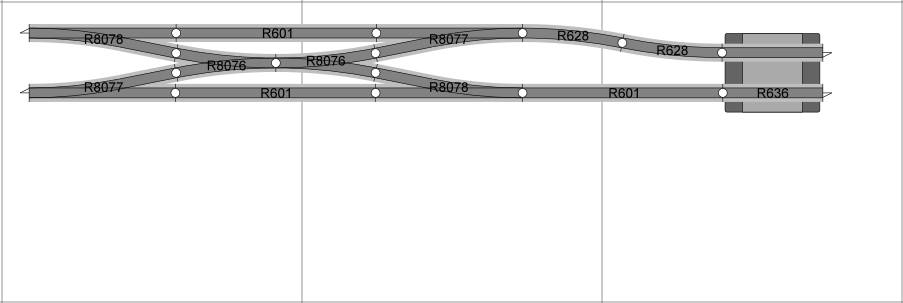
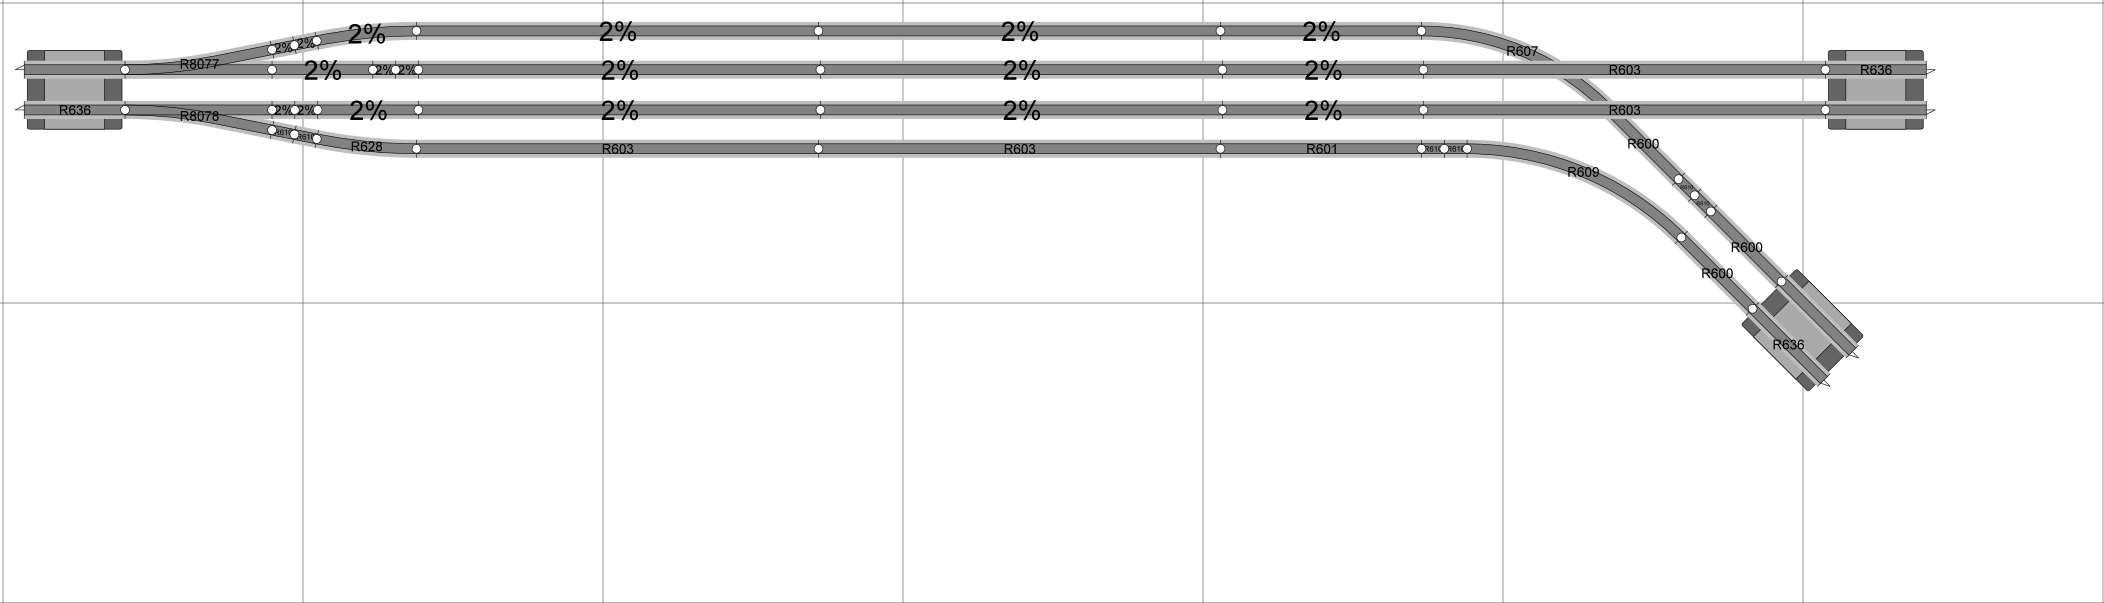
Other geometries
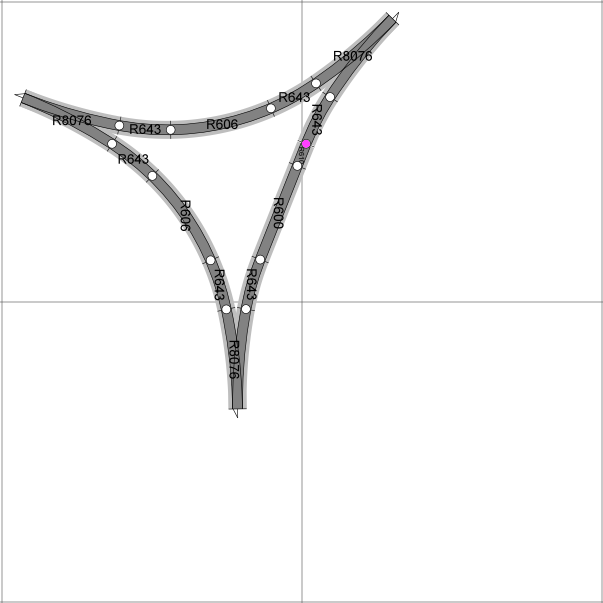
Geometries by request


Please post any requests for other layouts below.
Hi Jon, fanstastic resource thanks for producing this. I’m struggling with trying to get a R8074 to run into a parallel through station. For example trying to use Ropley on Mid Hants Railway as example. Is it possible? I can get close if i use R8077 and a R600 + R628.
Dear John would be able to offer some advice. I would like to model Bradford exchange station in the 1930’s particularly around the the St Dunstans junction which is a triangular loop. If I can create the space I would like to include the hammerton junction and the run back down to the Adolphus street goods station
Hi Simon
I recommend looking for old maps of the area, importing them into anyrail as an image, and then layout out track over the top — that is how I created the layouts for the sheffield stations that I have shared. If you need specific advice about anything do ask
Hi there, some really good points and graphics here.
My question is.
I want a low level non-scenic return loop. I believe I can use 2nd radius curves. My biggest loco is a B12 4−6−0 with a maximum train length of 3 thompson carriages.
I also want to hold a train there, while a second one passes through. Or hold either one, while the other moves off. I have a length of just under 8ft, as my layout is just under 8ft by just under 10ft.
This will be a low level affair so I can have a double track main level with an upper level branch. Hope you understand my question thanks
Hi Scott
I recommend trying AnyRail or an equivalent track layout tool as you can then experiment yourself with what will work.
Hi Jon
I have a OO gauge Hornby Flying Scotsman R1167 (code 100) set and a HO gauge Life-Like Union Pacific T8608AA (code 83?) set.
Is it feasible to join them to use in two loops or will the change in track height create problems?
This idea is more about utilising the track I have than running both OO and HO locomotives together.
Appreciate your suggestions.
Monique
Hi Monique
There is a good chance you’ll have problems running the code 100 loco on code 83 track as older models often have deeper flanges on the wheels. The HO loco will almost certainly run fine on code 100 track if it runs on code 83 track.
I’d highly recommend testing the Flying Scotsman on code 83 track before committing to anything as it may well “ride on the ties” or have issues with turnouts and frogs. If you find it works reliably then there is no reason you can’t mix track for use with both locos. If you have old rolling stock that doesn’t like the code 83 track it is easy to switch the wheels to ones with smaller flanges. I wouldn’t want to try swapping wheels with locos though, it would probably involve a lot of precision DIY.
There are products out there that will allow you to join code 83 to code 100 track without an issue, e.g. Atlas rail joiners with product code 551. If you have code 75 track then Peco make a track joiner for code 75 to 100 too.
Assuming everything does work then I would recommend using code 83 on scenic sections and code 100 for fiddle yards as the code 83 will look more realistic.
I attempted to recreate the angled turnout geometry (the smaller of the three) and for some reason it does not appear to fit. the R614 crossover combined with the R8072 switches do not preserve the distance between tracks to match the R636 Level Crossing both on the straight and angled areas. I am using SCARM though and not AnyRail (I assume you used that one) so the two programs may have different dimensions for the individual pieces but I don’t want to invest in the actual pieces or commit to the design only to find out they won’t fit on final assembly.
Hi Tony
The pink dots are where there is an imperfect but very small misfit. This would easily be accounted for by using a piece of flexitrack — it is small enough to not matter I believe
Thank you so much for making these. They are so helpful.
A tip picked up from Model Rail is the Hornby 2nd radius 1⁄4 curves can be used with the Y points to give a longer straight and minimal 50mm between centres.
ALL the Hornby radii can be used to create a diminishing/increasing radius curve which can be useful information when linking scenic and non-scenic sections of a layout.
Hornby Large radius R8077 & R8078) and Y points (R8076) can be used in combination for release roads at terminal stations, with the Y connecting to the diverging of the large radius points.
Any single Hornby 45degree curve R1 — R4 will connect to the diverging branches of short Hornby points (R8072 & R8073) the infinite radius link being formed by a cut length of R621 Flex a useful fix when working in O‑16.5 and other light/tramways were odd point-work arrangements were used to access water tanks or provide loco stabling off of the single mainline.
Similarly and half curve (22.5degrees) will work in similar fashion in combination with large radius points.
Anyrail is useful to set out the basic principles of what section works with which component to construct your needs.
Sectional track gets a bit of an iffy press BUT it can also provide a work round due to it’s constant arc be it 11.25, 22.5 or 45 degrees.
Hi Stuart
That’s really good info thanks.
For anyone new to modelling I wouldn’t generally recommend SeTrack anyway, it’s just there is a lot of it out there that is still perfectly usable and for “toy train” layouts as opposed to “models” it’s quicker and easier to get a working layout.
Awesomeness information Sir!!
Could you possibly post the most economic for point space, a 16 road marshalling yard please??
Hi Richard
I’m not sure exactly what you mean. I assume you don’t want to construct a cassette or sliding system — you’re looking for a 16-road fixed yard?
But I’m not sure what you mean by “economic for point space”?
Is this for a scenic area — i.e. a model of a marshalling yard, or is it for an off-scene area?
Assuming it’s for an off-scene area you presumably don’t care about prototypical operation — you just want to maximum ‘storage’ in th eminimum space or with the minimum number of points?
Are you wanting something double ended (i.e. with a through-track for a loop) or something ‘dead-end’? How many tracks do you need leading into each end?
Hi ya
Many thanks for coming back to me!
The marshalling yard is a background area.
I’m extremely pushed for space, in that I want to store 8 coach trains which is fine except that the points are taking up to much space that I haven’t got? So basically I need to get my 16 lanes in the shortest way possible with the points overall length
Hope that makes sense?
The less space wasted with the points length the better
Many Thanks again
Richard
Hi Richard
That makes sense. It sounds like you want a ‘staging yard’ specifically
Are you using Horny SeTrack or something else (e.g. Peco Streamline)?
How many tracks do you have coming in? Just 1 or more? E.g. if you have 2 could you have 2 separate 8‑lane sections. Or do you need to feed all 16 lanes into 1?
Is it just connected at one end or at both ends — i.e. does it need to have a run through part?
Assuming a single track entry with no pass-through the shortest length I can see so far would have the points take up 1m of length before your straight sections. 8‑coach trains would be about 2.5m long including a single-engine or a bit longer for MUs so you’d be looking at a total length of 3.5m and a width of ~1.6m. I’ve included a design below.
If you are tight for space you might be better with a traverser or elevator. Have a look at https://modelrailwayengineer.com/fiddle-yards/ for different possible approaches
Hi ya Jon
This is perfect for what I want to achieve, I can’t thank you enough!!
Thank you again
Kindest Regards
Richard
Hi Richard
After thinking about this some more I came up with an improved design. The length is marginally shorter but the main benefit is that the width is smaller (around 1m rather than around 1.6m) which means the furthest tracks will be much easier to reach. Note that the light blue parts are shown for design purposes but actually form part of the roads themselves, so the pointwork is less than 1m long
If anyone has any thoughts on a more efficient design please let me know
Fantastic information. All the information that you http://www.freetrackplans.com/Track-Plan-Index.php need to calculate the part no. and see what is what brilliant. All you need is to get picked up by google when track geometry is put in
Hi Chris. Agreed — FreeTrackPlans.com is great. I’ve generally tried to avoid duplication of the info they provide so I can recommend a good look at the many plans they have
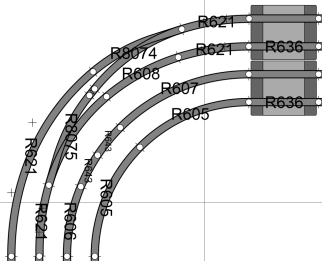
Hi Jon — really great site — thanks. I am new to using AnyRail — and planning first layout.Reference the ‘geometries by request’ section — top line — second from left — could you post the angle and radius of the various R621 sections you are using, please? I am having a problem replicating the diagram on Anyrail. Would be much appreciated.
Hi Iain
There are 4
The one next to the road-crossing on the R4 curve is r=54, a=17.5
The one below it on the R3 curve is r=56.5, a=17.5
The longer one on the R4 curve is a custom adjusted smooth curve with rmin=52.68
The final one — at the bottom of the R3 curve is r=56.5, a=17.5
Hope that helps. If not I can send the .any file over, just let me know
Jon — that’s really helpful — thanks. Iain
Would it be possible to incorporate a R8075 point on a 4th radius R8262 so as to create a spur off and then to effectively have the inner curve back on alignment (presently a complete 180 degree 4th radius curve) possibly by having short R410’s prior to the point? Many thanks.
Hi Jeff
I assume you mean on the standard Hornby 4‑track loop or equivalent 180 curve?
If so then yes, although not without cutting one of the R610’s short. I assume you mean R610’s?
You need to use R610 -> R8075 -> R610 -> R610 (cut short) -> R643. This will have the same start and end points as a 90 degree 4th radius corner. Note that it does include the 2nd radius R643.
If you wanted to achieve the same thing without the R643 you could use flexitrack to create a piece with a standard 4th radius of 572mm and a curve of 11.25 degrees. It is a shame Hornby don’t make one of these as standard as it would fit near perfectly in a pattern of R610 -> R8075 -> flexipiece which would form a smoother curve also of 90 degrees and fitting into place of a 4th radius 90 degree turn
Of course, flexitrack is a good idea anyway as you can then include easements which both look better and improve smooth running
Can you tell me the thickness (underside of sleeper to top of rail) of Peco 00/H0 Streamline Code 100 track? Every millimetre counts as I attempt establish the gradients on a layout that I am planning!
Thankyou.
Hi Ian.
I haven’t measured it precisely myself but I believe sleeper thickness is 2mm. The track on top of that is code 100 — i.e. 0.1inches or 2.54mm in metric. So in total from baseboard to top of track you’re looking at 4.5mm
For more info have a look at https://www.modelrailforum.com/forums/index.php?showtopic=27708
Interesting thanks, but note that Peco Streamline do not do curved track so cannot have radii except a minimum for the flexible track, and those radii are not 50mm apart.
Curve radii for points are ‘small’ at 610mm / 2 foot, ‘medium’ at 914mm / 3 foot and ‘large’ at 1524mm / 5 foot.
Also suggest adding point angles, 22.5° for Hornby, 12° for Peco S
Thanks Bill. I have added a clarification on the curve radii and also added your suggestion on point angles.
Thanks for the very useful information just starting out again at the grand old age of 64 Ive finally got the space and the time. now.
I’m pleased to hear it. This period of being stuck at home at least has the upside that it’s a great time to get back into modelling.
Jon, Is it safe to assume the grid used for the illustration is set at 12″ (305) if not what scale did you employ?
Hi Stuart. As a former physics teacher I’ve very much adopted the metric system (and I believe AnyRail software is from Germany) so the measurements are all metric. Where they are shown the grid lines illustrate 500mm squares.
Excellent resource! Even using flextrack you need to know suitable dimensions and a load of otherwise useless rusty old bits of track can be used as a template to give the shape for the new track to follow. Thank you.
Holy grail for quick referencing of configurations. Very much appreciate the amount of work put in and thank you for sharing.
Great site very helpful in giving basic design information, thanks for your efforts. I have a question ?
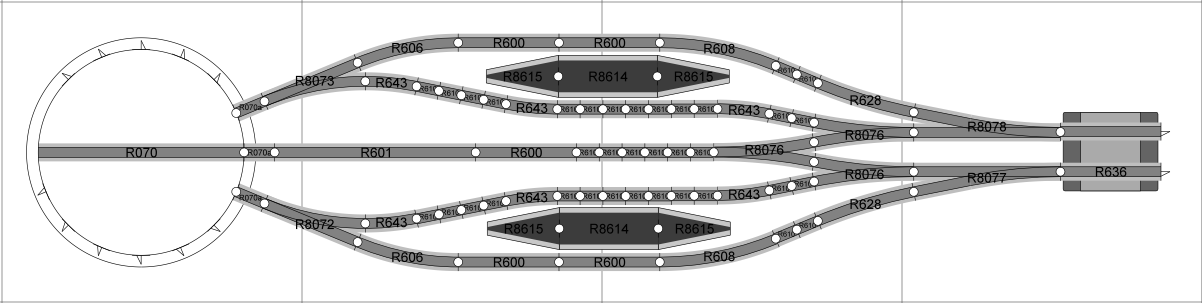
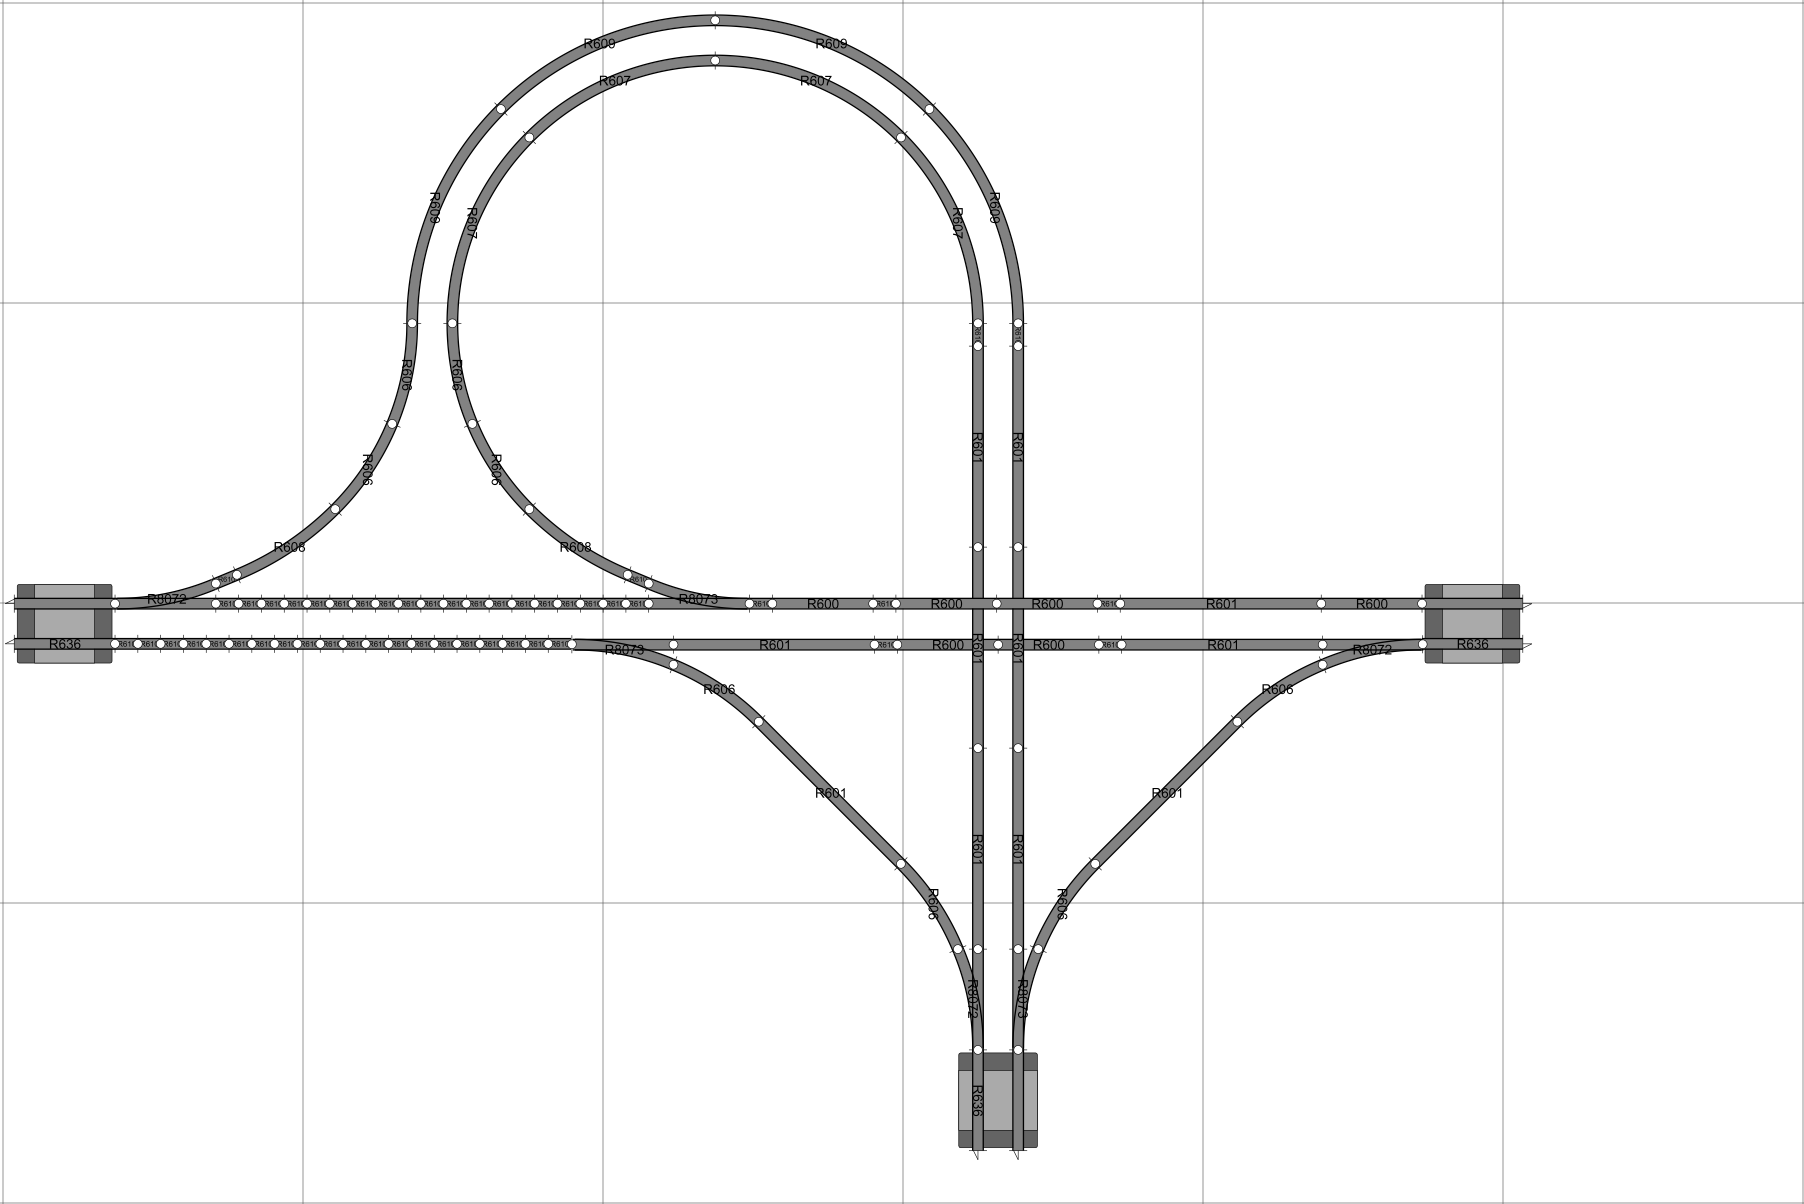
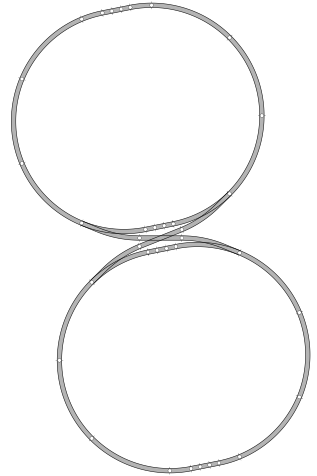
I’m trying to visualise if it is possible to have two circles of track side by side joined with 4 curved points so the circles can be run separately or switched with the points to create a figure of 8. In other words replacing an X crossing with points. Thanks for any guidance.
It’s certainly possible with a single track loop. A double track loop would be more complicated. I’ve added an image of a single track figure‑8 / double loop layout
Thanks for these. I would suggest moving the curved crossover to its own diagram.
Is there a geometry that allows a 2nd radius curve in a 3rd or 4th radius circle? Something to allow points with the curve on a 3rd radius circle.
I’m not sure which “curved crossover” you are referring to.
I’m also not quite certain what you mean by a 2nd radius curve in a 3rd or 4th radius circle? So here are several possible answer
(1) The standard hornby circle shows a 2nd radius to 3rd radius curved turnout geometry.
(2) I’m not aware of any way to do a 3rd to 4th radius on a curve without using flexitrack. With flexitrack it can be done.
(3) If you mean is it possible to use 2nd radius curves to enable space to fit an inward turning point into a 3rd or 4th radius turn then yes it is — you could just modify the standard Hornby loop to do this, or it is possible to do it in a more compact way.
I’ve added 2 extra geometries to show how to do (2) with flexitrack and (3) with a 3rd radius, altho it isn’t an absolutely perfect fit it will be close enough real world.
We are building a child friendly layout to raise funds for a local children’s charity from largely donated components, so your information was particularly useful for designing the layout using setrack curves.
That’s great. Thanks for your feedback. We always welcome ‘advertising’ for anything charitable, so feel free to let us know more about it.
Cheers
Jon, thanks for your work, shame I only discovered after starting to lay down my track. Your work, however, has been useful in correcting my track laying mistakes.
Thanks Jon, This has been really helpful… I’m now going to sit down and digest much of this and then try in AnyRail to create my own solutions based on the ones you’ve provided here! 🙂
What size is the full 4 track layout please useing the 4th radius ?
The radius of 4th radius is 572mm — so the total diameter will be 1144mm (1.15m or 45 inches). That is to the track centre, so you’d need to add on a small amount for the physical space required. I’d suggest adding on half a track width at either side, and half a track spacing at either side. That gives a grand total of 1228mm of space needed (1.23m or 48 1⁄3 inches). I’d want a little margin for error on top of that myself.
Hi,
Being a novice at this can you confirm the appx overall size of the board i.,e. 1.3m x 1.3m etc.for the Hornby standard 4 loop track.
Thanks a lot.
Bob
The grid squares are 50cm x 50cm so the standard 4 track loop is approx 1.4m x 2m.
To be more precise I measured it in AnyRail — with reasonable track clearance it could be fitted as shown onto a board 1.25m x 1.9m.
Super item, Jon. Sorry if I’ve missed it here, but when you mention track spacing, e.g H0 as 50mm, how is that space measured? Is it the space between the edges of the sleepers of two tracks or say, from track centre to track centre?
Track centre to centre.
Thank you for doing this, it has helped me realise what can be achieved.